1. Introduction
This is persented as a continuous document rather than slides since you’re going to be going thru it serially and it’s often easier to find things and move around with an HTML doc.
|
|
Mouseable commands
The commands presented in the lightly shaded boxes are meant to be moused into the bash shell to be executed verbatim. If they don’t work, it’s most likely that you’ve skipped a bit and/or haven’t cd’ed to the right place. Try to figure out why the error occured, but don’t spend more than a couple minutes on it. There should be enough TAs to help. |
2. Logging In
2.1. ssh
We have to connect to HPC with ssh or some version of it so let’s try the basic ssh. If you’re on a Mac laptop, open the Terminal App and type:
ssh -Y YourUCINETID@hpc.oit.uci.edu
# enter YourUCINETID password in response to the prompt.
If you’re using Windows and putty, type hpc.oit.uci.edu into the Host Name (or IP Address) pane. I believe that once you connect, you can save the configuration and click it the next time.
2.2. x2go
You should have installed the x2goclient software. If you haven’t, please try to install it now, using this screenshot as a guide, replacing hmangala with your UCINETID.
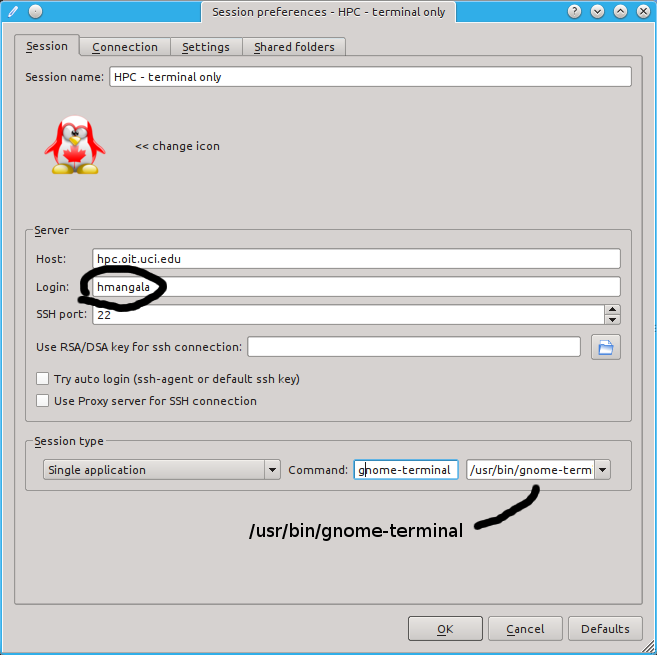
You can start either the Gnome desktop or specific applications by changing the configuration.
3. Make your prompt useful
The bash shell prompt is, as almost everything in Linux, endlessly customizable. At the very least, it should tell you what time it is, what host you’ve logged into, and which dir you’re in.
Just paste this into a shell
PS1="\n\t \u@\h:\w\n\! \$ "

# if you want to get really fancy, you can try this for a multicolored
# one that also shows the load on the system:

PS1="\n\[\033[01;34m\]\d \t \[\033[00;33m\][\$(cat /proc/loadavg | cut -f1,2,3 -d' ')] \
  \[\033[01;32m\]\u@\[\033[01;31m\]\h:\[\033[01;35m\]\w\n\! \$ \[\033[00m\]"

# that one will show up OK on most background, but on some light colored ones might wash out.
There is a reason for this. When you report a bug or problem to us, it’s helpful to know when you submitted the command, how busy the system was, and where you were when you submitted it. Copying in that prompt lets us know (most of the time).
OK - let’s do something.
4. Getting files from the web
4.1. wget
wget will retrieve ftp or http URLs with a minimum of fuss, continuing a failed retrieval, creating a new name if a file already exists, and supporting a huge number of other options.
wget http://hpc.oit.uci.edu/biolinux/nco/nco-4.2.5.tar.gz

# now get it again.

wget http://hpc.oit.uci.edu/biolinux/nco/nco-4.2.5.tar.gz

# what happened?
Then uncompress it with gunzip.
4.2. gxip/gunzip, pigz
The gzip family is probably the most popular de/compression utility on Linux. It will reduce the size of sequence file to about 30% of the original.
gunzip nco-4.2.5.tar.gz
# or could use pigz for parallel de/compression on multi-core machines
pigz -d nco-4.2.5.tar.gz
# time for this small file won't make much difference, but for large multiGB files it will.
4.3. bunzip2
The other major de/compression tool on Linux is called
4.4. tar
tar is (still) the default archive type for Linux/Unix. It creates a single file that contains everything that its pointed to, which provides some packing efficiency, but especially when it is explicitly compressed, it a tar file will take only 30-50% of the original space.
# 1st let's list what's in the tar file we decompressed:
tar -tvf nco-4.2.5.tar
#    ^


# what happened?

#now, lets extract it
tar -xvf nco-4.2.5.tar
#    ^
4.5. tar shortcuts
tar supports uncompressing while untarring, but we already uncompressed it, so 1st re-compress it.
gzip nco-4.2.5.tar
then uncompress it and untar it in one go.
tar -xzvf nco-4.2.5.tar.gz
4.6. curl does everything…
Do everything in one line with curl. Curl downloads the given URL and dy default spits the whole thing to STDOUT, so this is a case where pipes are meant to be used.
curl http://hpc.oit.uci.edu/biolinux/nco/nco-4.2.5.tar.gz | tar -xzf -

# tar's '-f' option means 'the following', and '-' typically means either STDOUT or STDIN,
depending on context. So  'tar -xzf - ' means perform the tar magic on STDIN.

# if we wanted to know WHAT was being extracted, we could use the 'v' option like this:
curl http://hpc.oit.uci.edu/biolinux/nco/nco-4.2.5.tar.gz | tar -xzvf -
#                                                                  ^
4.7. zip
Zip comes from the PC world’s pkzip. The format is now standarized and files zipped on PCs and Macs can be operated on by the Linux zip/unzip. Because Windows users and utilities are more used to zip archives, they are often used to punt data back and forth to Windows.
Let’s try to zip that nco directory with zip
cd
zip nco_src nco-4.2.5


# how big is it?
# how big is the gzipped version?
# how do you tell?
5. Getting files from specific accounts
5.1. commandline scp (Mac, Linux)
From your own laptop try to copy a file to HPC
scp TheFile You@hpc.oit.uci.edu:~
Did it appear to transfer? Where is it? Is it the right size?
5.2. commandline rsync (Mac, Linux)
Again, rsync is one of the most useful, efficient utilities for moving data that you’ll find. There are GUI versions for all platforms, and every MacOSX and Linux ditro ocmes with the commandline version.
Let’s copy the entire AnalysisDir from your laptop to HPC (where AnalysisDir is some dir that you choose).
rsync AnalysisDir You@hpc.oit.uci.edu:~
Now create a file in your LOCAL (laptop) AnalysisDir
ls -lat > AnalysisDir/listing
Now re-rsync
rsync AnalysisDir You@hpc.oit.uci.edu:~
See what happens?
5.3. GUI versions (CyberDuck, WinSCP, Filezilla, etc)
If you want, do the same thing with one of these GUI apps.
5.4. sshfs
# from your laptop
cd
mkdir hpc
sshfs you@hpc.oit.uci.edu:/data/users/you ~/hpc

# enter password if prompted.  Let us know if it doesn't work. Then...

ls hpc

# don't for get to UNmount it WHEN YOU'RE DONE with the session.
fusermount -u ~/hpc
Once you’ve sshfs-mounted your HPC dir on your laptop, you can copy files back and forth, or edit them with your Mac editors (BUT ONLY IN TEXT FORMAT) to HPC as if it was on your laptop.
You can also mount it the other way (mount your laptop to HPC) but often your laptop will have a DHCP address, so it may be trickier.
If you want to try this, it’s described in more detail here
6. Simple Commands
6.1. Commandline Editing
Remember:
-
↑ and ↓ arrows scroll thru your bash history
-
← and → cursor thru the current command
-
the Home, End, Insert, and Delete keys should work as expected.
-
PgUp and PgDn often /don’t/ work in the shell.
-
as you get comfortable with the commandline, some ppl like to keep their fingers on the keypad, so
-
^ means Ctrl
-
^a = Home (start of line)
-
^e = End (end of line)
-
^u = deletes from cursor to the start
-
^k = deletes from cursor to end of line
-
the ^ key amplifies some editing functions in the bash shell, so that ^ ← and ^ → will move the cursor by a word instead of by a char.
6.2. Listing, viewing files & dirs
cd    # start in your home dir

# what do these do?  Mouse them into your shell window one by one.
ls
ls -lt
ls -lat
ls -lS
ls -lSh
ls -lRh

file *

mc    # pseudo GUI for viewing your directory and manipulating files
      # F10 to quit out of it.
|
|
Don’t forget about setting aliases.
Once you find yourself typing a longish command for the 20th time, you might want a shorter version of it. Remember aliases? alias nu="ls -lt | head -22" # 'nu' list the 22 newest files in this dir |
6.3. Making and deleting & moving around directories
mkdir newdir
cd newdir
touch instafile
ls -l

# how big is that instafile?

cd  # go back to your $HOME dir
ls nco-4.2.5  # you can list files by pointing at their parent
cd nco-4.2.5
ls            # see?  no difference

file *        # what are all these files?
du -sh *      # how big are all these files and directories?

ls -lh *      # what different information do 'ls -lh' and 'du -sh' give you?

less I<tab>  # read the INSTALL file ('q' to quit, spacebar scrolls down, 'b' scrolls up, '/' searches)
7. STDOUT, STDIN, STDERR, and Pipes
7.1. What ARE these thangs?
STDIN - typically takes input from terminal
STDOUT - typically prints to terminal
STDERR - typically prints to terminal (this can be confusing..)
BUT these input & output channels can be changed to make data dance in useful ways.
ls prints its output on STDOUT. less can read either a file or STDIN. So..
ls -lt |less  # '|' is a pipe, connects the STDOUT of ls to the STDIN of less
# what are you looking at?
7.2. How to use pipes with programs
Here’s a simple example:
# What is the average size of the files in this directory?

# remember
# ls -lR will recursively list the long file listing, which contains the size in bytes
# so

ls -lR |scut -F=4 | stats  # will tell you.
Here’s a last one from the lecture. Break it up into individual commands and pipe each one into less to see what it produces, then insert the next command to see what it does
w |cut -f1 -d ' ' | sort | egrep -v "(^$|USER)" | uniq -c | wc

w | less
w |cut -f1 -d ' ' | less
w |cut -f1 -d ' ' | sort | less
w |cut -f1 -d ' ' | sort | egrep -v "(^$|USER)" | less
w |cut -f1 -d ' ' | sort | egrep -v "(^$|USER)" | uniq -c | less
Pipes allow you to mix and match output and input in various useful ways. Remember STDOUT/STDIN when you’re designing your own programs so you can format the output and read the input in useful ways down the road.
8. Text files and how to modify them
8.1. Most of the files you will be dealing with are text files. Remember the output of the file command:
Sat Mar 09 11:09:15 [1.13 1.43 1.53]  hmangala@hpc:~/nco-4.2.5
566 $ file *
acinclude.m4: ASCII M4 macro language pre-processor text
aclocal.m4:   Ruby module source text
autobld:      directory
autogen.sh:   POSIX shell script text executable
bin:          directory
bld:          directory
bm:           directory
config.h.in:  ASCII C program text
configure:    POSIX shell script text executable
configure.eg: ASCII English text, with very long lines
configure.in: ASCII English text, with very long lines
COPYING:      ASCII English text
data:         directory
doc:          directory
INSTALL:      ASCII English text
m4:           directory
Makefile.am:  ASCII English text
Makefile.in:  ASCII English text
man:          directory
obj:          directory
qt:           directory
src:          directory
Anything in that listing above that has ASCII in it is text, also POSIX shell script text executable is also a text file. Actually everything in it that isn’t directory is a text file of some kind, so you can read them with less and they will all look like text.
Text files are the default way of dealing with information on Linux. There are binary files (like .bam files or anything compressed (which a bam file is), or often, database files, and specialty data files such as netCDF or HDF5.
You can create a text file easily by capturing the STDOUT of a command.
In the example above, you could have captured the STDOUT at any stage by redirecting it to a file
ls -lR |scut -F=4 | stats

# could have been structured (less efficiently) like this:

ls -lR > ls.out
scut -F=4 < ls.out > only.numbers
cat only.numbers | stats

# note that '<' takes the STDOUT of the file to the right and directs it to the STDIN of the program to the left.
#  '>' redirects the STDOUT of the app to the left to the file on the right
# while '|' pipes the STDOUT of the program on the left to the program on the right.


# what's the diff between this line?

cat only.numbers > stats

# and this line:

cat only.numbers | stats

# Hmmmmm?
9. bash variables
The bash shell is also a programming environment. As such, it supports variables and all kinds of logic. A bash variable is essentially just a string assigned to a variable name:
MYNAME="type your name here"
# verify that assignment by using 'echo'
echo MYNAME

# oops.  Not what we want.  The problem is that variables are assigned using their plain names
# but are referenced with their '$' name

echo $MYNAME

# better. Sometimes because of the logic or embedding in a string, variables need to be 'super-quoted'
# in this case, use this construct: ${VARNAME} or $(VARNAME).

echo "MY name is: [${MYNAME}]"

# it's often useful to place brackets around variables when printing them to detect
# leading or lagging whitespace which may lead to oddities later.
# This is useful for all languages.
A lot of sophisticated logic is exquisitely awful in bash (use Perl or Python), but the simple stuff can be VERY useful. For example…
9.1. Globbing in bash
Globbing is not as disgusting as it sounds. It just a very simple way of grabbing all the files that have a common pattern. It’s among the simplest form of regular expression.
A structure that you’ll probaby use repeatedly is to do something over all files that have a common pattern in their names.
for THISFILE in May_4*.txt; do
   grep ERR $THISFILE > May.ERRs  # note output is not May_4.ERRs - what would happen if it was?
done
9.2. Iteration in bash
Or if you have a series of files of results files that are something_Jan_1_2013 thru something_Jan_22_2013 and you wanted to process only 01-14..
for NMBR in $(seq 01 14); do
   echo "Processing 'something_Jan_${NMBR}_2013"
done

# What about if it the file format was 'something_Jan_01_2013'
# (ie the '01' was always 2 chars wide)
# 'seq' can tke a format specifier to pad numbers

for NMBR in $(seq -f "%02g" 1 14); do
   echo "Processing something_Jan_${NMBR}_2013"
done

# play around with the formatting to see what you can do.
|
|
bash variables can be made of just about any command output
In the above example, a bash variable was created out of the output of a command: $(seq -f "%02g" 1 14) paste this; seq -f "%02g" 1 14 into a shell to see the result This is one of the advantages of bash - you can embed the output of any command in a single bash variable and then process it as a list. Careful of what you wish for tho… |
# You can also do the above in one line, inserting ';' between commands if nec
for ITER in $(seq -f "%03g" 1 14); do echo A64HOST=a64-${ITER}; done
#                                ^                            ^     ^
# Typically don't need ';' at end of lines.  The EOL indicates the end of a statement.
# sometimes you DO need to continue a long line over multiple lines.  You do this with a '\'
# which has to be the last character on the line (no following spaces or tabs)

for NMBR in $(seq -f "%02g" 1 14); do
   echo "This is a long line demonstrating that sometimes loquacious documentation \
requires continuation on a longer line to note that Processing something_Jan_${NMBR}_2013"
done
10. Regular Expressions and grep
A regular expression if simply a formal way of expressing a pattern. Since a lot of you may be searching for patterns in proteins and nucleic acids, it’s certainly worth your time to learn a bit about regexs.
When we were talking about globbing, "*" meant and anything. In a regex, it usually has the same meaning as well. So cat\* would match cat, catastrophe, catabolism, catmandu, etc.
The most frequently used regex operators (used in grep) are:
-
* means and anything
-
. means any single character
-
[abcd] means any of [a or b or c or d]; [^abcd] matches any character NOT 'a,b,c or d
-
[abcd]{3,5} means means 'any of [a or b or c or d] , but 3-5 times (abdda), but not (abdeda)
-
[a-e] means all the chars between a and e inclusive (abcde)
-
(this|that) means the regex has to match this or that
-
^ means the beginning of a line
-
$ means the end of a line
-
\s+ means whitespace (any combination of spaces & tabs)
-
some characters (most of the non-alphanumerics) need to be escaped (preceded with a backspace) to be found as a literal. If you’re searching for a literal asterix (*), it needs to be searched for as "\*"
So let’s search for some regexes in sequences.
First get some generic sequence.
wget http://hpc.oit.uci.edu/biolinux/hlef.seq

less hlef.seq   # to see what it is.  OK, it's a simple fasta format; all sequence in CAPS

# now search for all instances of aacgtcggatcg

grep -i  aacgtc hlef.seq  # use grep for straight patterns, egrep for 'extended regexes'

egrep -i  'a{2,3}[ga][ac]a{4,7}[at]{3,6}'  hlef.seq  # need the quotes.
#     ^^ to tell it to ignore case

read the grep man page for the entire set.
|
|
There is an app called tacg that does this much better for nucleic acids.
module load tacg/4.6.0 |
11. Programs
On HPC, programs (as opposed to utilities) are usually found in the module system, where they’re stored in various versions, separated roughly into categories. Utilities (ls, cd, rm, mv, etc) are usually found within the system itself.
To look for a program, you can type:
module avail # will spill all the apps and versions available
If you know which one you want, you can load it with:
module load app/version
or if you’re not sure about whether it’s the right program, try:
module whatis app # spills a short description of what it does (hopefully)
12. Resources
12.1. General Introduction
-
The An Introduction to the HPC Computing Facility aka The HPC User’s HOWTO.
-
The BioLinux - a gentle introduction to Bioinformatics on Linux class slides:
-
Instructors:
-
Jenny Wu <jiew5@uci.edu>
-
Harry Mangalam <harry.mangalam@uciedu>
-
12.2. Introduction to R
13. Distribution & Release Conditions
If this Document has been sent to you as a file instead of as a link, some of the content may be lost. The original page is here. The AsciiDoc source is here, which has embedded comments that show how to convert the source to the HTML. AsciiDoc is a simple and simply fantastic documentation language - thanks to Stuart Rackham for developing it.

This work is licensed under a Creative Commons Attribution-ShareAlike 3.0 Unported License.