1. Please read this
-
BDUC is a shared facility, run on almost no budget, by a few part-time contributors.
-
BDUC is NOT your personal machine. It’s shared by about 400 users of whom 20-50 may be using it at any one time. (Once connected, type w into the terminal to see who’s on the machine at the same time as you.) Actions you take on BDUC affect all other users.
-
BDUC has finite resources and bandwith. It’s only via the communal use of the SGE scheduler that it remains a usable resource. It uses 1Gigabit ethernet to connect the nodes which can support about 100MB/s per connection. That sounds like a lot, but not when it’s being shared by 50 others and especially not when 15 of those others are all trying to copy 20GB files back and forth (see below).
If you are unfamiliar with idea of a cluster, please read this brief description of cluster computing.
2. How to let us know what’s wrong
Since BDUC is a research cluster, it is in perpetual flux as apps, libraries, and modules are added, updated, or modified so sometimes a bug will creep in where none existed before. When you find something missing or a behavior that seems odd, please let us know. You can email the BDUC admins here.
Note that it will help considerably if you tell us more than It doesn’t work, or I can’t log in. If you want quick resolution of the problem, please send us as much relevant info as possible, including a description of what triggered the misbehavior. For us to help you, we have to be able to re-create the problem, so include the commandline you used, including all the options, the input and output file paths and preferably the command prompt which should include the node from which it was issued, and the time.
If the misbehavior involves an error message, doing a Google search on that error message verbatim will often produce the answer. (see Fix IT yourself with Google.
While many of you are not programmers, you’re dealing with programs, and if we are to have any hope of debugging the process that caused the failure, the more info the better (usually). PLEASE READ How to Report Bugs Effectively before you report a failure. At least glance at it.
If you’re going to spend a lot of time with computers, you should also read Eric Raymond’s encyclopedic How To Ask Questions The Smart Way. It will be of use thru your life.
If your problem seems to be about a missing library, such as:
unable to load shared object '/apps/R/2.14.0/lib64/R/modules/libfunky.so.2':/
   libfrenemy.so.3: cannot open shared object file: No such file or
directory
Please see the Resolving missing libraries Appendix section about resolving this error.
3. What is a BDUC?
The Broadcom Distributed Unified Cluster (BDUC) is, as the name suggests, a distributed group of clusters unified by running under a single Sun Grid Engine (SGE) Resource Manager. BDUC consists of subclusters of 2-48core AMD64 Opteron nodes (for a total of about 600cores) running 64bit Linux. One group of 80 CentOS nodes, 35 Debian-based nodes is in the NACS Academic Data Center and another of 40 nodes is in the ICS data center, for a total of 155 nodes / ~600 cores. There is another smaller subcluster (see BEAR, below) running Kubuntu.
The nodes are interconnected with 1Gb ethernet and have the MPICH, MPICH2, and OpenMPI (preferred) environments for parallel jobs. All the nodes share a common /home which is on a RAID6 system but which is NOT backed up. If you generate valuable data, you should move it off ASAP.
To be perfectly clear. If the BDUC storage system crashes, you will irretrievably lose all your data.
4. What is a BEAR?
The Broadcom EA Replacement (BEAR) is a Broadcom-supplied subcluster consisting of 8 larger nodes and some condo nodes administered especially for interactive use. These nodes each have 4-64 Opteron cores and 32-256GB RAM. Most run the 64bit Kubuntu (10.04.3) Desktop Edition, so you can have access to the full graphical KDE desktop via VNC or nx, as well as the individual GUI applications and shell utilities. BEAR is fully integrated with BDUC and shares its /home directories, but has a different, larger set of applications. One of the nodes (claw1) is half-reserved for interactive use; the others can be used for both interactive and batch runs (currently limited to 48hrs) on the claws Q. The claw6 node is usually reserved for running the commercial CLCBio application. Contact me if you want access to that system.
You can compile and run jobs on all the claw nodes, but don’t saturate claw1 with multiple serial or parallel jobs.
5. Condo Nodes
BDUC supports the use of condo nodes - privately purchased, but grafted onto the BDUC infrastructure to take advantage of the shared applications and administration. These nodes typically are configured to allow public jobs to run on them when their owners are not using them. For example, the a64-182, a64-183, claw9 and claw10 nodes are privately owned but available for public jobs. If the owners want to reclaim all the cores for a heavy analysis job, jobs running on it may be suspended.
6. How do I get an account?
You request an account by sending a message including your UCINetID to <bduc-request@uci.edu>. Please let us know in that message if you want to use the SGE batch system to submit long-running or multiple jobs. You should get an acknowledgement within a few hours and your account should be available then. By default, BDUC & BEAR are open to all postgrad UCI researchers, altho it will be available to undergrads with faculty sponsorship.
There is no cost to use BDUC, but neither is there any right to use it. Your account may be terminated if we observe activity that runs counter to good cluster citizenship.
6.1. How do I connect to BDUC?
You must use ssh, an encrypted terminal protocol. Be sure to use the -Y or -X options, if you want to view X11 graphics (see below).
On a Mac, use the Applications → Utilities → Terminal app.
On a WinPC, use the excellent putty. See also below.
On Linux, I assume that you know how to start a Terminal session with one of the bazillion terminal apps (konsole & terminator are 2 good ones).
Telnet access is NOT available. Use your UCINetID and associated password to log into the login node (bduc-login.nacs.uci.edu) via ssh.
To connect using a Mac or Linux, open the Terminal app and type:
ssh -Y UCINetID@bduc-login.nacs.uci.edu
# the '-Y' requests that the X11 protocol is tunneled back to you inside of ssh.
As of June 15th, 2009, you can also ssh directly to the claw1 node for a 64bit interactive node from anywhere on campus.
ssh -Y UCINetID@bduc-claw1.nacs.uci.edu
6.2. How to set up passwordless ssh
|
|
Passwordless ssh setup is now automatic
From Nov. 15th, 2009 onwards, this is set up for you automatically when your account is activated, so you no longer have to do this manually. However, as a reference for those of you who want to set it up on other machines, I’ve moved the documentation to the Appendix. The automatic setup also includes setting the ~/.ssh/config file to prevent the "first time ssh challenge problem". If a Mac or Linux user, you may also be interested in using ssh to execute commands on remote machines. This is described here. |
Note that in order to help you debug login and other problems, the sysadmin’s public ssh keys are also added to your ~/.ssh/authorized_keys file. If you do not want this, you’re welcome to comment it out, but unless it’s active, I can’t help you with problems that require a direct login.
6.3. ssh errors
Occasionally you may get the error below when you try to log into BDUC (or more rarely, among the BDUC nodes):
@@@@@@@@@@@@@@@@@@@@@@@@@@@@@@@@@@@@@@@@@@@@@@@@@@@@@@@@@@@
@    WARNING: REMOTE HOST IDENTIFICATION HAS CHANGED!     @
@@@@@@@@@@@@@@@@@@@@@@@@@@@@@@@@@@@@@@@@@@@@@@@@@@@@@@@@@@@
IT IS POSSIBLE THAT SOMEONE IS DOING SOMETHING NASTY!
 Someone could be eavesdropping on you right now (man-in-the-middle attack)!
It is also possible that the RSA host key has just been changed.
The fingerprint for the RSA key sent by the remote host is
93:c1:d0:97:e8:a0:f5:91:13:89:7d:94:6c:aa:9b:8c.
 Please contact your system administrator.
Add correct host key in /Users/joeuser/.ssh/known_hosts to get rid of this message.
Offending key in /Users/joeuser/.ssh/known_hosts:2
RSA host key for bduc.nacs.uci.edu has changed and you have requested strict checking.
 Host key verification failed.
The reason for this error is that the computer to which you’re connecting to has changed its identification key. This might be due to the mentioned man-in-the-middle attack but is far more likely to be an administrative change that has caused the BDUC node to have changed its ID. This may be due to a change in hardware, reconfiguration of the node, a reboot, an upgrade, etc.
The fix is buried in the error message itself.
Offending key in /Users/joeuser/.ssh/known_hosts:2
Simply edit that file and delete the line referenced. When you log in again, there will be a notification that the key has been added to your known_hosts file.
Should you want to be able to log in regardless of this warning, you’ll have to edit the /etc/ssh/ssh_config file and add the 2 lines as shown below. (Macs, Linux). There are good reasons for not doing this, but it’s a convenience that many of us use. Consider it the rolling stop of ssh security.
Host *
        StrictHostKeyChecking ask
After you do that, you’ll still get the warning (which you should investigate) but you’ll be able to log in.
If you’re using putty on Windows, you won’t be able to effect this security skip-around. Read why here.
6.4. After you log in…
Logging in to bduc.nacs.uci.edu will give you access to a Linux shell, (bash by default, tcsh, ksh available).
|
|
Some bash pointers.
The default shell (or environment in which you type commands) for your BDUC login is bash. It looks like the Windows CMD shell, but it is MUCH more powerful. There’s a good exposition of some of the things you can do with the shell here and a good cheatsheet here. If you’re going to spend some time working on BDUC, it’s worth your while to learn some of the more advanced commands and tricks. If you’re going to be using BDUC for more than a few times, it’s useful to set up a file of aliases to useful commands and then source that file from your ~/.bashrc. ie: # the ~/.aliases file contains shortcuts for frequently used commands # your ~/.bashrc file should source that file: '. ~/aliases' alias dabrick="ssh -Y dabrick" alias asrch="apt-cache search" alias ashow="apt-cache show" alias hg="history|grep " # search history for this regex alias pa="ps aux |grep " # search processes for this regex alias nu="ls -lt | head -11" # what are the 11 newest files? alias big="ls -lhS | head -20" # what are the 20 biggest files? # and even some more complicated commands alias edaccheck='cd /sys/devices/system/edac/mc && grep [0-9]* mc*/csrow*/[cu]e_count' You can also customize your bash prompt to produce more info than the default user@host. While you’re waiting for your calculations to finish, check out the definitive bash prompt HOWTO and / or use bashish to customize your bash environment. DirB is a set of bash functions that make it very easy to bookmark and skip back and forth to those bookmarks. Download the file from the URL above, source it early in your .bashrc and then read how to use it via this link. It’s very simple and very effective. Very briefly, s bookmark to set a bookmark, g bookmark to cd to bookmark, sl to list bookmarks. Recommended if you have deep dir trees and need to keep hopping among the leaves. |
You will also have access to the resources of the BDUC via the SGE commands. The most frequently used commands for SGE will be qrsh to request an interactive node and qsub to submit a batch job. You can also check the status of various resources with the qconf command. See the SGE cheatsheet for more detail.
The login node should be considered your 1st stop in doing real work. You can copy files to and from your home directory from the login node, but you shouldn’t run any long (>10m) jobs on the login node. If you do and we notice, we’ll kill them off. To do real work, request a node from the interactive queue, like this:
# for a 64bit interactive node
hmangala@bduc-login:~ $ qrsh -q int

# wait a few seconds...

hmangala@a64-001:~

#or you can ssh directly to one of the claw nodes:

ssh claw1

# or

ssh -Y claw1 # with X11 forwarding set up
7. Data Storage on BDUC
7.1. No limits, but no warnings either
We have not yet imposed disk quotas on BDUC. We encourage you to use the data storage you need, up to hundreds of GB, but we also warn you that if we detect large directories that have not been used in weeks, we retain the right to clean them out. The larger the dataset, the more scrutiny it will get. IF YOU HAVE LARGE DATASETS AND ARE NOT USING THEM, THEY MAY DISAPPEAR WITHOUT WARNING. We mean it when we say that if you generate valuable data, it is up to you to back it up elsewhere ASAP.
If you have no idea of how large your data is and how it is distributed, you can find out via the du command (disk usage).
$ cd /home
$ du -sh hmangala   # you would substitute *your* home dir
5.3G    hmangala/
To see the distribution of files graphically,
$ cd; ssh -Y claw1 'kdirstat'
This will launch kdirstat which will determine the size, type and age of your files and present them in a color-coded map by size. You can then inspect and hopefully remove the ones least needed.
7.2. How do I get my files to and from BDUC?
This is covered in more detail in the document HOWTO_move_data. There are currently a few ways to get your files to and from BDUC. The most direct, most available way is via scp. Besides the commandline scp utility bundled with all Linux and Mac machines, there are GUI clients for MacOSX and Windows, and of course, Linux. If you have large collections of files or large individual files that change only partially, you might be interested in using rsync as well.
Once you copy your data to your BDUC HOME directory, it is available to all the compute nodes via the same mount point on each, so if you need to refer to it in a SGE script, you can reference the same file in the same way on all nodes. ie: /home/hmangala/my/file will be the same file on all nodes.
|
|
Make sure bash knows if this is an interactive login
If you have customized your .bashrc to spit out some useful data when you log in (such as the number of jobs you have running), make sure to wrap that command in a test for an interactive shell. Otherwise, when you try to scp or sftp or rsync data to your BDUC account, your shell will unexpectedly vomit up the same text into the connecting program with unpleasant results. Wrap those commands with something like this in your .bashrc: interactive=`echo $- | grep -c i `
if [ ${interactive} = 1 ] ; then
# put all your intereractive stuff in here:
# ie tell me what my 22 newest files are
ls -lt | head -22
fi
|
7.2.1. Windows
The hands-down, no-question-about-it, go-to utility here is the free WinSCP, which gives you a graphical interface for SCP, SFTP and FTP.
7.2.2. MacOSX
There may be others but it looks like the winner here is the oddly named, but freely available Cyberduck, which provides graphical file browsing via FTP, SCP/SFTP, WebDAV, and even Amazon S3(!).
7.2.3. Linux
The full range of high-speed net data commandline utilities are available via the above-referenced HOWTO_move_data, however, for ease of use, it may well be easiest to use the built-in capabilities of KDE’s Swiss Army knife browser Konqueror or twin panel file manager Krusader which both support the secure file browser kio-plugin called fish. If you use a fish URL, you can connect the server via shared keys or via password:
fish://hmangala@bduc.nacs.uci.edu
7.3. archivemount
Once you’ve generated some data on BDUC, you may want to keep it handy for a short time while you’re further processing it. In order to keep it both compact and accessible, BDUC supports the archivemount utility on both the login and claw1 nodes. This allows you to mount a compressed archive (tar.gz, tar.bz2, and zip archives) on a mountpoint as a fuse filesystem. You can cd into the archive, modify files in place, copy files out of the archive, or copy files into the archive. When you unmount the archive, the changes are saved into the archive. Here’s an extended article on it from Linux Mag.
Here’s an example of how to use archivemount with a 84MB data tarball (data.tar.gz) that you want to interact with.
# how big is this thang?
$ ls -lh
total 84M
-rw-r--r-- 1 hmangala hmangala 84M Jun 15 14:55 jksrc.zip

# OK - 84MB, which is fine.  Now let's make a mount point for it.

$ mkdir jk

$ ls
jk/  jksrc.zip

# so now we have a zipfile and a mountpoint.  That's all we need to archivemount
# let's time it just to see how long it takes to unpack and mount this archive:

$ time archivemount jksrc.zip jk

real    0m0.810s  <-  less than a second wall clock time
user    0m0.682s
sys     0m0.112s

$ cd jk      # cd into the top of the file tree.

# lets see what the top of this file tree looks like.  All file utils can work on this data structure
$ tree |head -11
.
`-- kent
    |-- build
    |   |-- build.crontab
    |   |-- dosEolnCheck
    |   |-- kentBuild
    |   |-- kentGetNBuild
    |   `-- makeErrFilter
    |-- java
    |   |-- build
    |   |-- build.xml
<etc>

# and the bottom of the file tree.
$ tree |tail
            |   |-- wabaCrude.h
            |   `-- wabaCrude.sql
            |-- xaShow
            |   |-- makefile
            |   `-- xaShow.c
            `-- xenWorm
                |-- makefile
                `-- xenWorm.c

2286 directories, 12793 files <- lots of files that don't take up anymore 'real' space on the disk.


# how does it show up with 'df'?  See the last line..

$ df
Filesystem           1K-blocks      Used Available Use% Mounted on
/dev/md2             373484336  11607976 342598364   4% /
/dev/md1               1019144     47180    919356   5% /boot
tmpfs                  8254876         0   8254876   0% /dev/shm
/dev/sdc             12695180544 6467766252 6227414292  51% /data
bduc-sched.nacs.uci.edu:/share/sge62
                      66946520   8335072  55155872  14% /sge62
fuse                 1048576000         0 1048576000   0% /home/hmangala/build/fs/jk


# finally, !!IMPORTANTLY!! un-mount it.

$ cd ..   # cd out of the tree

$ fusermount -u jk    # unmount it with 'fusermount -u'
|
|
Don’t make huge archives if you’re going to use archivemount
archivemount has to "unpack" the archive before it mounts it, so trying to archivemount an enormous archive will be slow and frustrating. If you’re planning on using this approach, please restrict the size of your archives to ~100MB. If you need to process huge files, please consider using netCDF or HDF5 formated files and nco or pytables to process them. NetCDF and HDF5 are highly structured, binary formats that are both extremely compact and extremely fast to parse/process. BDUC has a number of utilities for processing both types of files including R, nco, and VISIT. |
7.4. sshfs
sshfs is a utility that allows you to mount remote directories in your BDUC home dir. Since it operates in user-mode, you don’t have to be root or use sudo to use it. It’s very easy to use and you don’t have to alert us to use it..
You have to be able to ssh to the machine from which you want to exchange files, typically the desktop or laptop you’re connecting to BDUC from (ergo WinPCs cannot do this without much more effort). For MacOSX and Linux, in the example below assume I’m connecting from a laptop named ringo to the BDUC claw1 node. I have a valid BDUC login (hmangala) and my login on ringo is frodo.
sshfs works on both the login and claw1 nodes.
frodo@ringo:~ $ ssh bduc-claw1  # from ringo, ssh to BDUC with passwordless ssh

 # <BDUC login stuff deleted>

# make a dir named 'ringo' for the ringo filesystem mountpoint
hmangala@bduc-claw1:~  $ mkdir ringo

# sshfs-attach the remote filesystem to BDUC on ~/ringo
# NOTE: you usually have to provide the FULL PATH to the remote dir, not '~'
# using '~' on the local side (the last arg) is OK.
# ie: this is wrong:
# hmangala@bduc-claw1:~  $ sshfs frodo@ringo.dept.uci.edu:~ ringo
#                                                         ^
# the following is right:
hmangala@bduc-claw1:~  $ sshfs frodo@ringo.dept.uci.edu:/home/frodo ~/ringo

hmangala@bduc-claw1:~  $ ls -l |head
total 4790888
drwxr-xr-x   2 hmangala hmangala          6 Dec 10 14:17 ringo/  # the new mountpoint for ringo
-rw-r--r--   1 hmangala hmangala       3388 Sep 22 16:25 9.2.zip
-rw-r--r--   1 hmangala hmangala       4636 Dec  8 10:18 acct
-rw-r--r--   1 hmangala hmangala        501 Dec  8 10:20 acct.cpu.user
-rwxr-xr-x   1 hmangala hmangala        892 Nov 11 08:55 alias*
-rw-r--r--   1 hmangala hmangala        691 Sep 30 13:21 all3.needs

 <etc>         ^^^^^^^^^^^^^^^^^ note the ownership

# now I cd into the 'ringo' dir
hmangala@bduc-claw1:~  $ cd ringo

hmangala@bduc-claw1:~/ringo  $ ls -lt |head
total 4820212
drwxr-xr-x 1 frodo frodo       20480 2009-12-10 14:43 nacs/
drwxr-xr-x 1 frodo frodo        4096 2009-12-10 14:41 Mail/
-rw------- 1 frodo frodo          61 2009-12-10 12:54 ~Untitled
-rw-r--r-- 1 frodo frodo          42 2009-12-10 12:44 testfromclaw
-rw-r--r-- 1 frodo frodo      627033 2009-12-10 11:22 sun_virtualbox_3.1.pdf

#<etc>       ^^^^^^^^^^^ note the ownership.  Even tho I'm on bduc-claw1, the original ownership is intact

# writing from BDUC to ringo filesystem
hmangala@bduc-claw1:~/ringo  $ echo "testing testing" > test_from_bduc

hmangala@bduc-claw1:~/ringo  $ cat test_from_bduc
testing testing

hmangala@bduc-claw1:~/ringo  $ ls -lt |head
total 4820216
drwxr-xr-x 1 frodo frodo       20480 2009-12-10 14:47 nacs/
-rw-r--r-- 1 frodo frodo          16 2009-12-10 14:46 test_from_bduc
drwxr-xr-x 1 frodo frodo        4096 2009-12-10 14:41 Mail/
#            ^^^^^^^^^^^  even tho I wrote it as 'hmangala' on BDUC, it's owned by 'frodo'

# and finally, unmount the sshfs mounted filesystem.
hmangala@bduc-claw1:~/ringo $ fusermount -u ringo

# get more info on sshfs with 'man sshfs'
8. YOU are responsible for your data
We do not have the resources to provide backups of your data. If you store valuable data on BDUC, it is ENTIRELY your responsibility to protect it by backing it up elsewhere. You can do so via the mechanisms discussed above, especially with (if using a Mac or Linux) rsync, which will copy only those bytes which have changed, making it extremely efficient. Using rsync (with examples) is described here.
9. How do I do stuff?
On the login node, you shouldn’t do anything too strenuous (computationally). If you run something that takes more than a minute or so to complete, you should be running on an interactive node or submit it to one of the batch queues.
qrsh given alone will start an ssh -Y session with one of the nodes in the interactive Q.
9.1. Can I compile code?
We have the full GNU toolchain available on both the CentOS interactive nodes and on all the Ubuntu/claw nodes, so normal compilation tools such as autoconf, automake, libtool, make, ant, gcc, g++, gfortran, gdb, ddd, java, python, R, perl, etc are available to you. We do not yet have any proprietary compilers or debuggers available (ie. the Intel or PGC compilers or the TotalView Debugger). Please let us know if there are other tools or libraries you need that aren’t available.
As of Jan 15, the GNU 4.6.2 series of compilers is available to all nodes. Set up the environment with module load gcc/4.6.2. Applications compiled with this series of compilers should be able to run on all nodes (the a64-XXX CentOS nodes, the clawX Ubuntu nodes and the nXXX Perceus nodes).
9.1.1. Compiling your own code
You can always compile your own (or downloaded) code. Compile it in its own subdir and when you’ve built the executables, install it rooted from your own home directory.
If the code is well-designed, it should have a configure shell script in the top-level dir. The ./configure --help command should then give you a list of all the parameters it accepts. Typically, all such scripts will accept the --prefix flag. You can use this to tell it to install everything in your $HOME dir.
ie
./configure --prefix=/home/you ...other options..
This command, when it completes successfully will generate a Makefile. At this point, you can type make (or make -j2 to compile on 2 CPUs) and the code will be compiled into whatever kind of executable is called for. Once the code has been compiled successfully (there may be a make test or make check option to run tests to check for this), you can install it in your $HOME directory tree with make install.
ie
/home/you/bin
/home/you/man
/home/you/lib
/home/you/include
/home/you/share
<etc>
Then you can run it out of your ~/bin dir without interfering with other code. In order for you to be able to run it transparently, you will have to prepend your ~/bin to the PATH environment variable, typically by editing it into the appropriate line in your ~/.bashrc.
export PATH=~/bin:${PATH}
9.2. How do I find out what’s available?
9.2.1. Via the module command
We use the tcl-based environment module system to wrangle non-standard software versions and subsystems into submission. To find out what modules are available, simply type:
$ module avail  # 'modav' gives you a different (scrollable) listing

---------------------------- /apps/Modules/MATH_STATS_ENG -----------------------------
R/2.12.1           R/2.15.1           matlab/R2011b      rapidminer/5.1.001
R/2.13.0           matlab/R2008b      octave/3.0.1       rstudio/0.95.265
R/2.14.0           matlab/R2009b      octave/3.2.0       scilab/5.3.1
R/2.15.0           matlab/R2010b      opensees/2.2.2

------------------------------ /apps/Modules/PROGRAMMING ------------------------------
antlr/3.2              interviews/17          openmpi/1.4.4
ants/1.9               java/1.6               petsc/3.1-p8
ants/1.9.x             matlab/R2008b          pgc/10.6
atlas/3.10.0           matlab/R2009b          python/2.6.1
bioperl/1.6.1          matlab/R2010b          python/2.7.2
boost/1.410            matlab/R2011b          readline/5.2
boost/1.51.0           mpfr/2.4.2             sage/5.1
cern_root/5.32.03      mpich/1.2.7            scilab/5.3.1
enthought_python/6.3-2 mpich2/1.1.1p1         sge/6.2
enthought_python/7.3.1 mpich2/1.2.1p1         sparsehash/1.6
gcc/4.6.2              nagios-client/1.4.16   sqlite/3.6.22
gmp/4.3.2              ncl/5.1.1              sqlite/3.7.9
gnu_parallel/20101202  nco/4.0.4              subversion/1.6.9
gpu/1.0                netcdf/3.6.3           subversion/1.7.1
hadoop/0.20.2          netcdf/4.1.1           tcl/8.5.5
hdf5/1.8.4p1           open64/4.2.3           tcl/8.5.9
hdf5/1.8.5.p1          openmpi/1.4.2          tk/8.5.5
hdf5/1.8.7             openmpi/1.4.3
hdf5/1.8.9             openmpi/1.4.3_P

------------------------------- /apps/Modules/DATA_VIZ --------------------------------
gnuplot/4.2.4 matlab/R2008b matlab/R2010b scilab/5.3.1
gnuplot/4.5p1 matlab/R2009b matlab/R2011b visit/1.11.2

---------------------------- /apps/Modules/IMAGE_ANALYSIS -----------------------------
freesurfer/4.5.1Dev fsl/4.1             loni_pipeline/5.1.4
freesurfer/5.0.0    fsl/4.1.6           mricron/12.2009
freesurfer/5.1.0    imagej/1.41         simset/2.9

-------------------------- /apps/Modules/BIO_GENO_ASSEMBLERS --------------------------
abyss/1.2.5        bowtie/2.0.0b7     ray/1.4            stampy/1.0.20
abyss/1.2.6        bwa/0.5.7          ray/1.6.1          velvet/1.0.19
allpathslg/36681   bwa/0.5.9          ray/1.7            velvet/1.1.02
bfast/0.6.3c       bwa/0.6.1          soap/2.20          velvet/1.2.03
bowtie/0.12.3      edena/2.1.1        ssaha2/2.5.3       velvet/1.2.06
bowtie/0.12.7      gapcloser/20100125 stampy/1.0.12      velvet/1.2.07
bowtie/0.12.8      maq/0.7.1          stampy/1.0.15
bowtie/2.0.0b6     mosaik/1.0.1388    stampy/1.0.17

---------------------------- /apps/Modules/BIO_GENO_UTILS -----------------------------
annovar/2010Jan17   blat/3.4            lastz/1.02          samtools/0.1.18
annovar/2012Feb23   cd-hit/4.5.7        meme/4.7.0          samtools/0.1.7
annovar/2012Mar08   cd-hit/4.6          meme/4.8.1          tabix/0.2.5
annovar/2012May25   exonerate/2.2       msort/20081208      tablet/1.11.01.25
bamtools/2.1.1      gatk/1.0.5336       multiz-tba/012109   tacg/4.5.1
bedtools/2.15.0     gatk/1.6-5-g557da77 nmica/0.8.0         taverna/2.2.0
bedtools/2.6.1      gtf2gff3/0.1        picard/1.45         triton/4.0.0
bioperl/1.6.1       igv/1.5.58          picard/1.67         vcftools/0.1.9
blast/2.2.26+       khmer/8.2011        samtools/0.1.13

----------------------- /apps/Modules/BIO_GENO_VARIANTS_LINKAGE -----------------------
haploview/4.1 hugeseq/1.0.1 pindel/0.2.4q plink/1.07

------------------ /apps/Modules/BIO_GENO_GENE_STRUCTURE_PREDICTION -------------------
augustus/2.6        cnver/0.7.2         mauve/2.3.1         rmblast/1.2
augustus/2.6.1      cnver/0.8.1         recon/1.70          sva/1.02
breakdancer/1.2     cnvnator/0.2.5      repeatmasker/3.3.0
breakseq/1.3        impute/2.2.2        repeatmodeler/1.0.5
breakway/0.6        mach/1.0.18         repeatscout/1.0.5

------------------------------ /apps/Modules/BIO_EVOMICS ------------------------------
eigensoft/3.0 hyphy/2.0     orthomcl/1.4  phast/1.222.1
hmmer/3.0     mrbayes/3.1.2 paml/4.4

-------------------------- /apps/Modules/BIO_CHIPSEQ_RNASEQ ---------------------------
MACS/1.4.2-1    cufflinks/2.0.0 express/1.1.1   tophat/1.2.0
cufflinks/0.8.1 cufflinks/2.0.2 miso/0.4.1      tophat/1.3.1
cufflinks/1.1.0 express/1.0.0   quest/2.4       tophat/1.4.0
cufflinks/1.3.0 express/1.1.0   tophat/1.0.13   tophat/2.0.4

---------------------------- /apps/Modules/BIO_MOLDYNAMICS ----------------------------
amber/11               gromacs_s_ompi/4.5.4_P namd/2.8b1
autodock/4.2.3         gromacs_s_ompi/4.5.5   nwchem/6.0
bionetgen/2.2.0        maestro/91207          rosetta/3.1
charmm/c35b6           mgltools/1.5.4         ssc/0.6
gamess/2010R1          modeller/9v7           tinker/5.1.09
gaussian/3.0           namd/2.6               vmd/1.8.7
gromacs_s_ompi/4.5.4   namd/2.7b1             zdock/3.0.1

------------------------------- /apps/Modules/BIO_NEURO -------------------------------
neuron/7.0

(current as of Oct 18th, 2012)
To load a particular module, use the module load <module/version> command:
$ module load imagej/1.41 # for example
If a module has a dependency, it should set it up for you automatically. Let us know if it doesn’t. If you note that a module has an update that we should install, tell us.
Also, if you neglect the version number, it will load the numerically highest version, which does not necessarily mean the latest, since some groups use odd numbering schemes. For example, samtools/0.1.7 is numerically higher (but older) than samtools/0.1.18.
|
|
If you want an app upgraded/updated
If you need the newest version of an app, FIRST make sure that we don’t already have it installed. See module avail above. THEN please supply us with a link to the updated version so we don’t have to scour the internet for it. If it’s going to require a long dependency list, please also supplyy us with an indication of what that is. If it’s an app that few other people will ever use, consider downloading it and installing it in your own ~/bin directory. If after that you think it’s worthwhile, we’d certainly consider installing it system-wide. |
9.2.2. Via the shell
This is a bit tricky. there are literally thousands of applications that are available and many of them have names that are entirely unrelated to their function. In order to determine whether a well-know application is already on the system, you can simply try typing its name. If it’s NOT installed or not on your executable’s PATH, the shell will return command not found.
All the interactive nodes have TAB completion enabled at least in the bash shell. This means that if you type a few characters of the name and hit <TAB> twice, the system will try to compete the command for you. If there are multiple executables that match those characters, the shell will present all the alternatives to you. ie
$ jo<TAB><TAB>
jobs        jockey-kde  joe         join
You can then complete the command or enter enough characters to make the command unique and hit <TAB> again and the command will complete.
9.2.3. Via the installer Database
The 2 installer databases (one for Ubuntu’s apt-get on the claw nodes, one for CentOS’s yum on the rest) will let you search all the applications that HAVE been installed and all those that CAN be installed.
To search for the ones that CAN be installed on the BEAR (claw1-4) nodes, use the command asrch (an alias for apt-get search). This searches thru all the application names and descriptions in a case-insensitve search to find a wide variety of names that match the pattern you give it. For example:
$ asrch biology
avida-base - Auto-adaptive genetic system for Artificial Life research
biomode - [Biology] An Emacs mode to edit genetic data
bioperl - Perl tools for computational molecular biology
   <41 lines deleted>
molphy - [Biology] Program Package for MOLecular PHYlogenetics
phylip - [Biology] A package of programs for inferring phylogenies
phylip-doc - [Biology] A package of programs for inferring phylogenies
treetool - [Biology] An interactive tool for displaying trees
tacg - [Biology] a sophisticated 'grep' for nucleic acid strings
To see a more detailed descripton of the application, use ashow (an alias for apt-get show), which will provide a few lines or paragraphs of text about the application:
$ ashow phylip
Package: phylip
Priority: optional
Section: multiverse/science
Installed-Size: 5792
Maintainer: Ubuntu MOTU Developers <ubuntu-motu@lists.ubuntu.com>
Original-Maintainer: Debian-Med Packaging Team <debian-med-packaging@lists.alioth.debian.org>
Architecture: amd64
Version: 1:3.67-2
Depends: libc6 (>= 2.4), libx11-6, libxaw7, libxt6
Suggests: phylip-doc
Filename: pool/multiverse/p/phylip/phylip_3.67-2_amd64.deb
Size: 2520650
MD5sum: eacef9de8503a21b90a05bfabea9fbca
SHA1: 61a2ec92c1b0699db07ea08196848e2f41f79a6c
SHA256: 3453f9b3bc9d418bf0c4941eb722e807a96ec32ac3a041df34ee569929bd19dc
Description: [Biology] A package of programs for inferring phylogenies
 The PHYLogeny Inference Package is a package of programs for inferring
 phylogenies (evolutionary trees) from sequences.
 Methods that are available in the package include parsimony, distance
 matrix, and likelihood methods, including bootstrapping and consensus
 trees. Data types that can be handled include molecular sequences, gene
 frequencies, restriction sites, distance matrices, and 0/1 discrete
 characters.
Homepage: http://evolution.genetics.washington.edu/phylip.html
Bugs: mailto:ubuntu-users@lists.ubuntu.com
Origin: Ubuntu
HOWEVER, this only tells you that the application or library is available, not whether it’s installed. To find out whether it’s installed, you use dpkg. dpkg -S pattern will tell you whether a package containing a file that has that pattern has been installed and what package provided it: ie
$ dpkg -S ifconfig
net-tools: /sbin/ifconfig
net-tools: /usr/share/man/man8/ifconfig.8.gz
The -l flag has a different meaning, but can also be useful
dpkg -l |grep -i python |less
 <lots of output - try it>
There is a GUI application called synaptic that provides a more pointyclicky interface but asrch and dpkg are much faster via the commandline.
To search for all possible applications and libraries on the BBUC nodes using yum, it’s similar:
$ yum search lapack
Loading "downloadonly" plugin
Loading "fastestmirror" plugin
Loading mirror speeds from cached hostfile
 * epel: mirror.hmc.edu
 * dag: apt.sw.be
 * atrpms: dl.atrpms.net
 * rpmforge: ftp-stud.fht-esslingen.de
 * base: centos.cogentcloud.com
 * updates: mirrors.usc.edu
 * lscsoft: www.lsc-group.phys.uwm.edu
 * addons: mirror.stanford.edu
 * extras: centos.promopeddler.com
lapack-devel.i386 : LAPACK development libraries
blas-devel.i386 : LAPACK development libraries
lapack.i386 : The LAPACK libraries for numerical linear algebra
blas-devel.i386 : LAPACK development libraries
   <10 lines deleted>
blas.i386 : The BLAS (Basic Linear Algebra Subprograms) library.
lapack-devel.i386 : LAPACK development libraries
blas.i386 : The BLAS (Basic Linear Algebra Subprograms) library.
R-RScaLAPACK.i386 : An interface to perform parallel computation on linear algebra problems using ScaLAPACK
To find out if a package has been installed:
$ yum list lapack-devel.i386
Loading "downloadonly" plugin
Loading "fastestmirror" plugin
Loading mirror speeds from cached hostfile
 * epel: mirror.hmc.edu
 * dag: apt.sw.be
 * atrpms: dl.atrpms.net
 * rpmforge: ftp-stud.fht-esslingen.de
 * base: mirrors.xmission.com
 * updates: mirrors.usc.edu
 * lscsoft: www.lsc-group.phys.uwm.edu
 * addons: centos.cogentcloud.com
 * extras: mirror.hmc.edu
Installed Packages
lapack-devel.i386                        3.1.1-1.el5.rf         installed
9.2.4. Via the Internet
Obviously, a much wider ocean to search. My first approach is to use a Google search constructed of the platform, application name, and/or function of the software. Something like
linux image photography hdr 'high dynamic range' # '' enforces the exact phrase
which yields this page of results.
Also, don’t be afraid to try Google’s Advanced Search or even Google’s Linux Search.
After evaluating the results, you’ll come to a package that seems to be what you’re after, pfstools, for example. If you didn’t find this in the previous searches of the application databases, you can look again, searching explicitly:
$ashow pfstools
 ...
Description: command line HDR manipulation programs
 pfstools is a set of command line (and two GUI) programs for reading,
 writing, manipulating and viewing high-dynamic range (HDR) images and video
 frames. All programs in this package exchange data using a simple generic
 file format (pfs) for HDR data. It is an attempt to integrate existing file
 formats by providing a simple data format that can be used to exchange data
 between applications.
 ...
and then you can ask an admin to install it for you. Typically the apps found in the application repositories lag the latest releases by a few point versions, so if you really need the latest version, you’ll have to download the source code or binary package and install it from that package. You can compile your own version as a private package, but to install it as a system binary, you’ll have to ask one of the admins.
9.3. Interactive Use
Logging on to an interactive node may be all that you need. If you want to slice & dice data interactively, either with a graphical app like MATLAB, VISIT, JMP, or clustalx, or a commandline app like nco or scut or even hybrids like gnuplot or R, you can run them from any of the interactive nodes, read, analyze and save data to your /home directory. As long as you satisfy the graphics requirements, you can view the output of the X11 graphics programs as well.
9.4. bash Shortcuts
The bash shell allows an infinite amount of customization and shortcuts via scripts and the alias command. Should you wish to make use of such things (such as nu to show you the newest files in a directory or ll to show you the long ls output in human readable form), you can define them yourself by typing them at the commandline:
alias nu="ls -lt |head -22" # gives you the 22 newest files in the dir
alias ll="ls -l"   # long 'ls' output
alias llh="ls -lh" # long 'ls' output in human (KB, MB, GB, etc) form
alias lll="ls -lh |less" # pipe the preceding one into the 'less' pager

# for aliases, there can be no spaces between the alias and the start of
# definition: ie
[myalias = "what it means"] is wrong.  It has to be
--------^^^
[myalias="what it means"]
-------^^^
You can also place all your useful aliases into your ~/.bashrc file so that all of them are defined when you log in. Or separate them from the ~/.bashrc by placing them into a ~/.alias file and have it sourced from your ~/.bashrc file when you log in. That separation makes it easier to move your alias library from machine to machine.
A collection of such aliases is stashed on the login node at /usr/local/share/alias.login
# copy it to your local dir:
    cp /usr/local/share/alias.login ~/.alias
# and modify it as needed then 'activate' it by
    source ~/.alias
# or
    . ~/.alias
# or (once you've sourced it once)
    sa  # aliased now to 'source  ~/.alias'
9.5. byobu and screen: keeping a session alive between logins
In most cases, when you log out of an interactive session, the processes associated with that login will also be killed off, even if you’ve put them in the background (by appending the starting command with &). If you regularly need a process to continue after you’ve logged out, you should submit it to the SGE scheduler with qsub (see immediately below).
However, sometimes it is convenient to continue a long-running process when you have to log out (as when you have to shut down your network connection to take your laptop home). In this case, you can use the underappreciated screen program, which establishes a long-running proxy connection on the remote machine that you can detach from and then re-attach to without losing the connection. As far as the remote machine is concerned, you’ve never logged off, so your running processes aren’t killed off. When you re-establish the connection by logging in again, you can re-attach to the screen proxy and take up as if you’ve never been away.
You can also use screen as a terminal multiplexer, allowing multiple terminal sessions to be used from one login, especially useful if you’re using Windows with PuTTY that doesn’t have a multiple terminal function built into it.
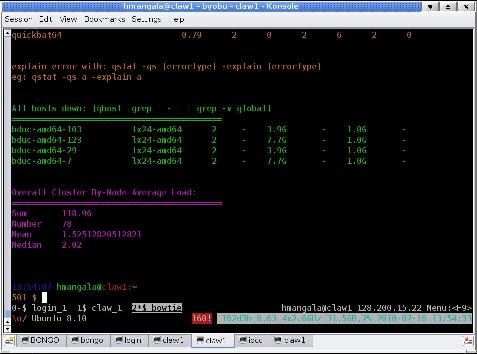
For these reasons, screen by itself is a very powerful and useful utility, but it is admittedly hard to use, even with a good cheatsheet. To the rescue comes a screen wrapper called byobu which provides a much easier-to-use interface to the screen utility. byobu has been installed on all the interactive nodes on BDUC and can be started by typing:
$ byobu
There will a momentary screen flash as it refreshes and re-displays the login, and then the screen will look similar, except for 2 lines along the bottom that show the screen status. In the images below, the one at left is without byobu; at right is with byobu. The byobu screen shows 3 active sessions: login, claw_1, and bowtie. The graphical tabs at the bottom are part of the KDE application konsole which also supports multiplexed sessions (allowing you to multi-multiplex sessions (polyplex?))
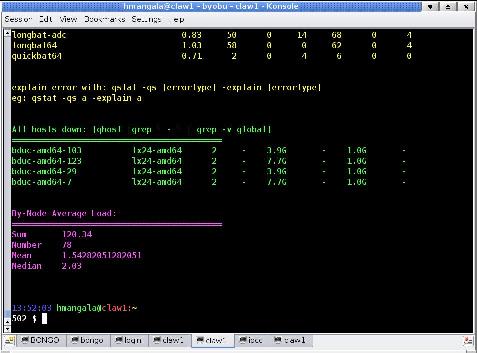
The help screen, shown below, can always be gotten to by hitting the <F9> key, followed by the <Enter> key.
Byobu 2.57 is an enhancement to GNU Screen, a command line
tool providing live system status, dynamic window management,
and some convenient keybindings:

F2    Create a new window    |  F6    Detach from the session
F3    Go to the prev window  |  F7    Enter scrollback mode
F4    Go to the next window  |  F8    Re-title a window
F5    Reload profile         |  F9    Configuration
                             |  F12   Lock this terminal
'screen -r'  - reattach      |  <ctrl-A> Escape sequence
'man screen' - screen's help | 'man byobu'  - byobu's help
Most usefully, you can create new sessions with the F2 key, switch between them with F3/F4 and detach from the screen session with F6.
Note that you must have started a screen session before you can detach, so to make sure you’re always in a screen session, you can have it start automatically on login by changing the state of the Byobu currently launches at login flag (at bottom of screen after the 1st F9.
When you log back in after having detached, type byobu again to re-attach to all your running processes. If you set byobu to start automatically on login, there will be no need of this, of course, as it will have started.
Note that byobu is just a wrapper for screen and the native screen commands continue to work. As you become more familiar with byobu, you’ll probably find yourself using more of the native screen commands. See this very good screen cheatsheet.
10. Environment Variables
Environment variables (envvars) are those which are set for your session and can be modified for your use. They include directives to the shell as to which browser or editor you want started when needed, or application-specific paths to describe where some data, executables, or libraries are located. For example, here is my envvar list, generated by printenv:
hmangala@claw2:~
506 $ printenv
MANPATH=/sge62/man:/usr/share/man
XKEYSYMDB=/usr/share/X11/XKeysymDB
HOST=claw2.bduc
KDEWM=kwin
TERM=xterm
SHELL=/bin/bash
XDG_SESSION_COOKIE=e0592749581405c0291e7dff4d6bf8ae-1331569334.933079-1976089657
GTK2_RC_FILES=/home/hmangala/.gtkrc-2.0
CPPFLAGS=-DNC_64BIT_OFFSET=0
SSH_CLIENT=10.255.78.2 35986 22
PERCEUS_HOME=/usr/var/lib/perceus/
SGE_CELL=bduc_nacs
SSH_TTY=/dev/pts/0
sge=/home/hmangala/bduc/trunk/sge
ARC=lx24-amd64
USER=hmangala
LS_COLORS=no=00:fi=00:di=01;34:ln=01;36:pi=40;33:so=01;35:bd=40;33;01:cd=40;33;01:or=01;05;37;41:mi=01;05;37;41:ex=01;32:*.cmd=01;32:*.exe=01;32:*.com=01;32:*.btm=01;32:*.bat=01;32:*.sh=01;32:*.csh=01;32:*.tar=01;31:*.tgz=01;31:*.arj=01;31:*.taz=01;31:*.lzh=01;31:*.zip=01;31:*.z=01;31:*.Z=01;31:*.gz=01;31:*.bz2=01;31:*.bz=01;31:*.tz=01;31:*.rpm=01;31:*.cpio=01;31:*.jpg=01;35:*.gif=01;35:*.bmp=01;35:*.xbm=01;35:*.xpm=01;35:*.png=01;35:*.tif=01;35:
SGE_JOB_DIR=/sge62/bduc_nacs/spool/qmaster/jobs
XEDITOR=nedit
MAIL=/var/mail/hmangala
PATH=/home/hmangala/bin:/home/local/bin:/usr/local/sbin:/usr/local/bin:/bin:/sbin:/usr/bin:/usr/sbin:/usr/X11R6/bin/u/local/bin:/sge62/bin/lx24-amd64:/sge62/util:/sge62/utilbin/lx24-amd64:/sge62/mpich2/bin:/usr/NX/bin:/usr/X11R6/bin:/sge62/mpich2/bin:/usr/local/sbin:/usr/local/bin:/usr/sbin:/usr/bin:/sbin:/bin:/usr/games:/sge62/bin/lx24-amd64:/home/hmangala/bin
PWD=/home/hmangala
_LMFILES_=/usr/share/Modules/modulefiles/sge/6.2
EDITOR=joe
SGE_EXECD_PORT=537
LANG=en_US.UTF-8
LAMRSH=ssh
SGE_QMASTER_PORT=536
MODULEPATH=/usr/share/Modules/modulefiles:/etc/modulefiles
SGE_ROOT=/sge62
LOADEDMODULES=sge/6.2
SVN_SSH=ssh
TACGLIB=/usr/local/lib/tacg
CXX=g++
SSH_ASKPASS=/usr/libexec/openssh/gnome-ssh-askpass
SHLVL=1
HOME=/home/hmangala
LOGNAME=hmangala
CVS_RSH=ssh
SSH_CONNECTION=10.255.78.2 35986 10.255.78.6 22
MODULESHOME=/usr/share/Modules
BROWSER=/usr/bin/konqueror
CC=gcc
module=() {  eval `/usr/bin/modulecmd bash $*`
}
_=/usr/bin/printenv
Many of these are generated by the bash shell or by system login processes. Some ones that I set are:
EDITOR=joe                   # the text editor to be invoked from 'less' by typing 'v'
TACGLIB=/usr/local/lib/tacg  # a data dir for a particular application
XEDITOR=nedit                # my default GUI/X11 editor
BROWSER=/usr/bin/konqueror   # my default web browser
Many applications require a set of envvars to define paths to particular libraries or to data sets. In bash, you define an envvar very simply by setting it with an =:
# for example, PATH is the directory tree thru which the shell will search for executables
PATH=/usr/bin

# you can append to it (search the new dir after the defined PATH):
PATH=$PATH:/usr/local/bin

# or prepend to it (search the new dir before the defined PATH)
PATH=/usr/local/bin:$PATH
Note that when you assign to these envvars, you use the non-$name version and when you use them in bash scripts, you use the $name version. Further, in some cases when you use the $name version, if it’s not clear by context as well as allowing you to do additional magic with parameter expansion (using the braced variable to get values from shell or to perform additional work on the variable). Double parentheses (()) are used to indicate that arithmentic is being performed on the variables. Note that inside the parens, you don’t have to use the $name:
# using $a, $b, & $c in an arithmetic expression:
$ a=56;  b=35 c=1221
$ echo $((a + b * 4/c))
56

# note this will be integer math, so '56' is returned, not '56.1146601147'
See this bit on stackoverflow for a longer, but still brief explanation.
11. SGE Batch Submission & Queues
If you have jobs that are very long or require multiple nodes to run, you’ll have to submit jobs to an SGE Queue (aka Q).
qsub job_name.sh will submit the job described by job_name.sh to SGE, which will look for an appropriate Q and then start the job running via that Q. For example, if you need a long running Q, you can request it explicitly: qsub -q long job_name.sh , which will try to run it on the least loaded machine.
Once you log into the login node (via ssh -Y <your_UCINetID>@bduc-login.nacs.uci.edu), you can get an idea of the hosts that are currently up by issuing the qhost command. You can find out the status of your jobs with qstat alone, which will tell you the status of your jobs or
qstat -u '*'
will tell you the status of all jobs currently queued or running. A very useful PDF cheatsheet for the SGE q commands is here.
To get an overall idea of the status of the entire cluster, type bduc_status, which will dump a listing of:
-
who’s logged into the node
-
the top 100 jobs currently running
-
nodes/Qs in error state
-
overall cluster node usage by Q.
11.1. SGE qstat status codes
SGE status codes:
| Category | State | SGE Letter Code |
|---|---|---|
Pending |
pending |
qw |
pending, user hold |
qw |
|
pending, system hold |
hqw |
|
pending, user and system hold |
hqw |
|
pending, user hold, re-queue |
hRwq |
|
pending, system hold, re-queue |
hRwq |
|
pending, user and system hold, re-queue |
hRwq |
|
Running |
running |
r |
transferring |
t |
|
running, re-submit |
Rr |
|
transferring, re-submit |
Rt |
|
Suspended |
job suspended |
s, ts |
queue suspended |
S, tS |
|
queue suspended by alarm |
T, tT |
|
all suspended with re-submit |
Rs, Rts, RS, RtS, RT, RtT |
|
Error |
all pending states with error |
Eqw, Ehqw, EhRqw |
Deleted |
all running and suspended states with deletion |
dr, dt, dRr, dRt, ds, dS, dT, dRs, dRS, dRT |
11.2. qsub scripts
The shell script that you submit (job_name.sh above) should be written in bash and should completely describe the job, including where the inputs and outputs are to be written (if not specified, the default is your home directory. The following is a simple shell script that defines bash as the job environment, calls date, waits 20s and then calls it again.
#!/bin/bash
# (c) 2008 Sun Microsystems, Inc. All rights reserved. Use is subject to license terms.
# This is a simple example of a SGE batch script

# request Bourne shell as shell for job
#$ -S /bin/bash

# print date and time
date
# Sleep for 20 seconds
sleep 20
# print date and time again
date
Note that your script has to include (usually at the end) at least one line that executes something - generally a compiled program but it could also be a Perl or Python script (which could also invoke a number of other programs). Otherwise your SGE job won’t do anything.
11.2.1. Using qsub scripts to keep data local
BDUC depends on a network-shared /home filesystem. The actual disks are in the bduc-login node so users are local to the data when they log in. However, when you submit an SGE job, unless otherwise specified, the nodes have to read the data over the network and write it back across the network. This is fine when the total data involved is a few MB, such as is often the case with molecular dynamics runs - small data in, lots of computation, small data out. However, if your jobs involve 100s or 1000s of MB, the network traffic can grind the entire cluster to a halt.
To prevent this network armaggedon, there is a /scratch directory on each node which is writable by all users, but is sticky - the files written can only be deleted by the user who wrote them.
$ ls -ld /scratch
drwxrwxrwt 6 root root 4096 Oct 29 18:20 /scratch/
         ^
         + the 't' indicates 'stickiness'
If there is a chance that your job will consume or emit lots of data, please use the local /scratch dir to stage your input data, and especially write your output.
This is dirt simple to do. Since your qsub script executes on each node, your script should copy the data from your $HOME dir to /scratch/$USER/input to stage the data, then specify /scratch/$USER/input as input, with your application writing to /scratch/$USER/output_node#. When the application has finished, copy the output files back to your $HOME dir again, and finally cleaning up the /scratch/$USER/whatever afterwards.
Here’s another page of information on using scratch space.
11.2.2. More example qsub scripts
-
an example script that does data copying to /scratch
-
another example script that uses /scratch and collates and moves data back to $HOME after it’s done.
-
sleeper1.sh is a slightly more elaborate one.
-
fsl_sub is a longer, much more elaborate one that uses a variety of parameters and tests to set up the run.
-
array_job.sh is a qsub script that implements an array job - it uses SGE’s internal counter to vary the parameters to a command. This example also uses some primitive bash arithmetic to calculate the parameters.
-
qsub_generate.py is a Python script for generating serial qsubs, in a manner similar to the SGE array jobs. However, if you need more control over your inputs & outputs and /or are more familiar with Python, it may be useful.
-
a script that launches an MPI script in a way that allows it to suspend and restart. If you do not write your MPI scripts in this way and try to suspend them, they will be aborted and you’ll lose your intermediate data. (NB: it can take minutes for an MPI job to smoothly suspend; only seconds to restart).
|
|
Staging data - some important caveats
READING: Copying data to the remote node makes sense when you have large input data and it has to be repeatedly parsed. It makes less sense when a lot of data has to be read once and is then ignored. (If the data is only read once, why copy it? Just read it in the script.) If you stage it to /scratch, it is still traversing the network once so there is little advantage. (If you have significant data to be re-read on an ongoing basis, contact me and depending on circumstances, we may be able to let you leave it on the /scratch system of a set of nodes for an extended period of time. Otherwise, we expect that all /scratch data will be cleaned up post-job. WRITING: Due to the limitations of the gluster filesystem, where zillions of small writes can result in very bad write performance, it may make sense to stage your output to the node-local /scratch dir and then copy the output files to their final resting places after the analysis. This will bypass gluster’s bad performance on repeated small writes and instead do a single streaming write after everything has been written (at which gluster is very good). If it does make sense to stage your data, please try to follow the guidelines below. If the cluster locks up, offending jobs will be deleted without warning so ask me if you have questions. Limit your staging bandwidth # use scp to copy from bduc-login to a local node dir as would be required in a qsub script scp -C -l 2000 bduc-login:~/my_file /scratch/hmangala This prevents a few bandwidth-unlimited jobs from causing the available cluster bandwidth to drop to zero, locking up all users. If you have a single job that will copy a single 100MB file, then don’t worry about it; just copy it directly. Assume the aggregate bandwidth of the cluster is about 50 MB/s. No set of jobs should exceed half of that, so if you’re submitting 50 jobs, the total bandwidth should be set to no more than 25MB/s or 0.5 MB/s per job or in scp terms -l 5000. Check the network before you submit a job How to check for cluster congestion
Fri Sep 23 14:56:15 [0.13 0.20 0.36]  hjm@bongo:~
617 $
(For those that don’t have the fancy prompt, you can add it by inserting the following line into your ~/.profile or ~/.bashrc.) PS1="\n\[\033[01;34m\]\d \t \[\033[00;33m\][\$(cat /proc/loadavg | cut -f1,2,3 -d' ')] \ \[\033[01;32m\]\u@\[\033[01;31m\]\h:\[\033[01;33m\]\w\n\! \$ \[\033[00m\]"
|
11.2.3. Debugging why your job isn’t running
You can (at least partially) diagnose your own SGE problems. It may well be that the Qs are set up sub-optimally (and if so, we’ll try to work with you to optimize them), but you can see very quickly if that’s the case or if it’s due to a more mundane problem
$ qstat                  # will give you a list of your SGE jobs
$ qstat -j <job number>  # will give you an exhaustive list of reasons
                         #  that your job is not executing
11.2.4. More example qsub scripts
-
sleeper1.sh is a slightly more elaborate one.
-
fsl_sub is a longer, much more elaborate one that uses a variety of parameters and tests to set up the run.
-
array_job.sh is a qsub script that implements an array job - it uses SGE’s internal counter to vary the parameters to a command. This example also uses some primitive bash arithmetic to calculate the parameters.
-
qsub_generate.py is a Python script for generating serial qsubs, in a manner similar to the SGE array jobs. However, if you need more control over your inputs & outputs and /or are more familiar with Python, it may be useful.
11.3. Current Queue Organization
The batch queues have been to reorganized for clarity. They now are organized as follows:
Queue        time*      total CPUs   Type
===============================================

long-ics     ( 78 batch cores)
long-adc     ( 64 batch cores)
long         (191 batch cores)


int           2hr          4         interactive (*)

long-ics     240hr         78        batch

long-adc     240hr         64        batch

long-quad    240hr        124        batch (all 4core motherboards)

long         240hr        191        batch


* for the 'int' Q, you have 2 hr of aggregate CPU time (not
    wallclock time).
To submit short jobs (<12hr), you can most easily not specify a Q - it will go on any batch Q. To run on a longxxx Q, either specify the estimated runtime in the submission script by including the -l h_rt parameter
#$ -l h_rt=00:30:00 #30 min run
(also see below)
or submit specifically to one of the long Qs.
ie:
$ qsub -q long-ics yourshellname.sh

# or include the Q spec in the script:

#$ -q long-ics
11.4. Fixing qsub errors
Occasionally, a script will hiccup and put your job into an error state. This can be seen by the qstat state output:
$ qstat -u '*'

job-ID  prior   name       user         state submit/start at     queue                          slots ja-task-ID
 - - - - - - - - - - - - - - - - - - - - - - - - - - - - - - - - - - - - - - - - - - - - - - - - - - - - - - - - -
   6868 0.62500 simple.sh  hmangala     E     06/08/2009 11:29:02 claws@claw3.bduc                   1
                                       ^^^
the E (^) means that the job is in an ERROR state. You can either delete the job with qdel:
qdel <Job ID> # deletes the job
or often change it’s status with the qmod command.
qmod -cj <Job ID> # clears the error state of the job
11.5. Some useful SGE script parameters
When you submit an SGE script, it is processed by both bash and SGE. In order to protect the SGE directives from being misinterpreted by bash, they are prefixed by #$ This prefix causes bash to ignore the rest of the line (considers it a comment), but allows SGE to process the directive correctly.
So, the rules are:
-
If it’s a bash command, don’t prefix it at all.
-
If it’s an SGE directive, prefix it with both characters (#$).
-
If it’s a comment, prefix it only with a #.
Here are some of the most frequently used
#$ -N job_name     # this name shows in qstat
#$ -S /bin/bash    # run with this shell
#$ -q long-ics     # run in this Q
#$ -l h_rt=50:00:00  # need 50 hour runtime
#$ -l mem_free=2G  # need 2GB free RAM
#$ -pe mpich 4     # define parallel env
#$ -cwd            # run the job out of the current directory
                   # (the one from which you ran the script)
#$ -o job_name.out # the name of the output file
#$ -e job_name.err # the name of the error file
#  or
#$ -o job_name.out -j y            # '-j y' merges stdout and stderr

#$ -t 0-10:2       # task index range (for looping); generates 0 2 4..10
#                 Uses $SGE_TASK_ID to find out whether they are task
                  0, 2, 4, 6, 8 or 10

#$ -notify
#$ -M <email> - send mail about this job to the given email address.
#$ -m beas          # send a mail to owner when the job
#                       begins (b), ends (e), aborted (a),
#                       and suspended(s).
When a job starts, a number of SGE environment variables are set and are available to the job script.
Here are most of them:
-
ARC - The Sun Grid Engine architecture name of the node on which the job is running; the name is compiled-in into the sge_execd binary
-
SGE_ROOT - The Sun Grid Engine root directory as set for sge_execd before start-up or the default /usr/SGE
-
SGE_CELL - The Sun Grid Engine cell in which the job executes
-
SGE_JOB_SPOOL_DIR - The directory used by sge_shepherd(8) to store jobrelated data during job execution
-
SGE_O_HOME - The home directory path of the job owner on the host from which the job was submitted
-
SGE_O_HOST - The host from which the job was submitted
-
SGE_O_LOGNAME - The login name of the job owner on the host from which the job was submitted
-
SGE_O_MAIL - The content of the MAIL environment variable in the context of the job submission command
-
SGE_O_PATH - The content of the PATH environment variable in the context of the job submission command
-
SGE_O_SHELL - The content of the SHELL environment variable in the context of the job submission command
-
SGE_O_TZ - The content of the TZ environment variable in the context of the job submission command
-
SGE_O_WORKDIR - The working directory of the job submission command
-
SGE_CKPT_ENV - Specifies the checkpointing environment (as selected with the qsub -ckpt option) under which a checkpointing job executes
-
SGE_CKPT_DIR - Only set for checkpointing jobs; contains path ckpt_dir (see the checkpoint manual page) of the checkpoint interface
-
SGE_STDERR_PATH - The path name of the file to which the standard error stream of the job is diverted; commonly used for enhancing the output with error messages from prolog, epilog, parallel environment start/stop or checkpointing scripts
-
SGE_STDOUT_PATH - The path name of the file to which the standard output stream of the job is diverted; commonly used for enhancing the output with messages from prolog, epilog, parallel environment start/stop or checkpointing scripts
-
SGE_TASK_ID - The task identifier in the array job represented by this task
-
ENVIRONMENT - Always set to BATCH; this variable indicates that the script is run in batch mode
-
HOME - The user’s home directory path from the passwd file
-
HOSTNAME - The host name of the node on which the job is running
-
JOB_ID - A unique identifier assigned by the sge_qmaster when the job was submitted; the job ID is a decimal integer in the range to 99999
-
JOB_NAME - The job name, built from the qsub script filename, a period, and the digits of the job ID; this default may be overwritten by qsub -N
-
LOGNAME - The user’s login name from the passwd file
-
NHOSTS - The number of hosts in use by a parallel job
-
NQUEUES - The number of queues allocated for the job (always 1 for serial jobs)
-
NSLOTS - The number of queue slots in use by a parallel job
The above was extracted from this useful page. For more on SGE shell scripts, see here.
For a sample SGE script that uses mpich2, see below
11.6. Where do I get more info on SGE?
Oracles purchase of Sun has resulted in a major disorganization of SGE (now OGE) documentation. If a link doesn’t work, it may be because of this kerfuffle. tell me if a link doesn’t work anymore and I’ll try to fix it.
-
The ROCKS group has a very good SGE Introduction from the User’s perspective. Ignore the ROCKS-specific bits.
-
Google Sun Grid Engine is a good, easy start. Maybe you’ll be lucky.. :)
-
Chris Dagdigian’s SGE site is very good and has an excellent wiki
-
The official Sun (now Oracle) Grid Engine site has a lot of good links.
-
The SGE docs are the final word, but there are a lot of pages to cover.
If you need to run an MPI parallel job, you can request the needed resources by Q as well by specifying the resources inside the shell script (more on this later) or externally via the -q and -pe flags (type man sge_pe on one of the BDUC nodes).
12. Special cases
12.1. Editing Huge Files
In a word, don’t. Many research domains generate or use multi-GB text files. Prime offenders are log files and High-Thruput Sequencing files such as those from Illumina. These are meant to be processed programmatically, not with an interactive editor. When you use such an editor, it typically tried to load the entire thing into memory and generates various cache files. (If you know of a text editor that handles such files without doing this, please let me know.)
Otherwise, use the utilities head, tail, grep, split, less, sed, and tr, possibly in combinations with Perl/Python to peek into such files and or change them.
grep especially is one of the most useful tools for text processing you’ll ever use.
For example, the following command starts at 2,000,000 lines into a file and stops at 2,500,000 lines and shows that range in the less pager.
$ perl -n -e 'print if ( 2000000 .. 2500000)' humongo.txt | less
In addition, please use the commandline utilities gzip/gunzip, bzip2, zip, zcat, etc instead of the ark graphical utility on such files. ark apparently tries to store everything in RAM before dumping it.
12.2. NAMD scripts
namd is a molecular dynamics application that interfaces well with VMD. Both of these are available on BDUC - see the output of the module avail command.
The qsub scripts to submit namd 2.7 jobs to the SGE Q’ing system are a bit tricky due to the way early namd is compiled - the specification of the worker nodes is provided by the charmrun executable and some complicated additional files supplied with the namd package. This means that namd2.7x is more complicated to set up and run than namd2.8x. The qsub scripts are provided separately below.
12.2.1. namd 2.7x
namd 2.7x runs require the complicated mechanism described here. namd2.7_sge_submit.sh is a SGE submission script that runs successfully on BDUC if given a valid namd input file. It must be submitted to SGE as follows:
qsub -pe openmpi <#cores> <name_of_script>
# or explicitly, for an 8core job
qsub -pe openmpi 8 namd_sge_submit.sh
# or the '-pe specification can be provided inside the file as well.
#See the example above.
(thanks to Chad Cantwell for the hints and pointer to the original page)
12.2.2. namd 2.8x
namd 2.8x uses a simpler calling convention, altho it also uses the charmrun wrapper. The script above has been modified to use the namd 2.8x approach and is available here as namd2.8_sge_submit.sh. Note the final application call is much simpler. In most cases, you should use the 2.8x or later version.
It is submitted to the SGE scheduler as above.
12.3. SATe
|
|
SATe is ONLY available on Claw nodes
Until we get a better sense of SATe popularity, it and its requisite tools are only available on the Claw nodes. You can log into Claw1 directly (ssh -Y <your_UCINetID>@bduc-claw1.nacs.uci.edu) and from there, to any of the other Claw nodes. If you are going to run a job that will take more than a 10 minutes, we INSIST that you run it under SGE so that the nodes don’t get oversubscribed. How to write and submit an SGE script is described here. Note that you will have to run on the claws queue. ie Your qsub script will have include the SGE directive: #$ -q claws |
SATe is a Python wrapper around a number of Phylogenetic tools. It, along with its requisite tools (ClustalW2, MAFFT, MUSCLE, OPAL, PRANK, RAxML) are installed in the shared /usr/local/bin directory of the Claw nodes.
The test cases work with the default settings, but if you want to change any parameters, you have to edit the configuration file and feed it to run_sate.py with -c as shown below.
export SH=/usr/local/bin # <- shortens the following lines considerably

run_sate.py -c sate.cfg  -i $SH/sate_data/small.fasta -t $SH/sate_data/small.tree -j test
            ^^^^^^^^^^^
You can name the configuration file anything you like, but it has a specific format. Especially, do NOT try to start comments anywhere except the 1st character of a line, and then only beginning with #.
Here is a good SATe configuration file to start from.
Here is the same SATE configuration file with some bad comments (marked as such with BAD COMMENT in the offending line.)
Here is an example qsub submission script for SATe. Submit to SGE as:
qsub SATE.sh
12.4. R on BDUC
R is an object-oriented language for statistical computing, like SAS (see below). It is becoming increasingly popular among both academic and commercial users to the extent that it was noted in the New York Times in early 2009. For a very simple overview with links to other, better resources, see this link
There are multiple versions of R on BDUC, and they do not all behave identically. Since we have a split cluster (most nodes (80; 160 cores) run CentOS (RedHat-based) ; the 4 claw nodes (16 cores) run a version of Ubuntu, (Debian-based). Because of slightly different library structures and versions, some R add-ons don’t work across the subclusters, so in those situations, we concentrate on getting the standard approach working on the CentOS nodes, and provide work-arounds on the claw nodes.
The module system provides R versions 2.10.0 and 2.8.0 for all nodes. Additionally, the claw nodes provide version 2.9.0 because it is the default version. Finally, I’ve added the R development version which is automatically downloaded, compiled, and re-installed every night from the R archives. This is the VERY LATEST version, so new that it (infrequently) fails. Howeer, if you need the latest and greatest version, it’s available. To load any of these versions, inquire what the available versions are with module avail and then use the appropriate module load R/<version> to set up the paths.
For most things, everything works identically. The things that don’t usually have to do with parallel processing in R and the underlying Message Passing Interface (MPI) technology:
-
Rmpi should work on all CentOS nodes with version 2.10.0. The claw nodes will not work with the 2.10.0 version as it has a complicated lib dependency that leads into some very bushy areas. Rmpi DOES work on the claw nodes, but only under R 2.9.0 (the default).
-
rsprng (R’s wrapping of SPRNG) is available on all the CentOS nodes for R/2.10.0 and on the default 2.9.0 version on the claw nodes.
-
snow and snowfall are available on the CentOS nodes with version 2.10.0 and on the claw nodes with the default 2.9.0 version.
12.5. SAS 9.3 for Linux
We have a single node-locked license for SAS 9.3 on claw1, a 4core Opteron node with 32GB RAM. While the license is for that node only, as many instances of SAS can be run as there is RAM for it.
To start SAS on claw1, first ssh directly to claw1:
ssh -Y <Your_UCINETID>@bduc-claw1.nacs.uci.edu

# then change directories (cd) to where your data is
cd /dir/holding/data

# and start SAS
sas
This will start an X11 SAS session, opening several windows on your monitor (as long as you have an active X11 server running). If you’re connecting from Mac or Windows, please see this link.
You can use the SAS program editor (one of the windows that opens automatically), or use any other editor you want and paste or import that code into SAS. The combination of emacs and ESS (Emacs Speaks Statistics) is a very powerful combination. It’s mostly targeted to the R language, but it also supports SAS and Stata.
Nedit also has a template file for SAS.
|
|
To use Java (ods graphics)
SAS 9.3 uses Java for at least some of its plotting routines (the ods graphics). The 64b version of SAS that we use on claw1 still uses the 32b version of Java which needs the environment vars set to tell SAS where to find things, so if you are going to use SAS on claw1, please add the following to your ~/.bashrc file: # convenience shortcut
export SASPATH=/home/apps/SAS-x86_64/9.3
# following is required to allow 32bit java to find its libs
export LD_LIBRARY_PATH=${SASPATH}/jre1.5.0_21/lib/i386:\
${SASPATH}/jre1.5.0_21/lib/i386/server:${LD_LIBRARY_PATH}
# Need to set the CLASSPATH to the JRE root so when SAS calls java, the right executable is called.
export JAVAHOME=${SASPATH}/jre1.5.0_21/
|
12.6. Parallel jobs
BDUC supports several MPI variants.
12.6.1. MPICH2
BDUC is running MPICH2 version 2-1.1.1p1. Using it is not hard, but requires a few things:
-
To compile MPI binaries, you’ll have to module load the MPICH2 environment:
module load mpich2
-
You need to set up passwordless ssh so that you can ssh to any BDUC node without entering a password, including editing your ~/.ssh/config file to prevent 1st-time connection warnings from interrupting your jobs
-
you need to create the file ~/.mpd.conf, as below:
|
|
From Dec. 15th, 2009 onwards, the .mpd.conf is set up for you automatically when your account is activated, so you no longer have to do this manually. However, as a reference for those of you who want to set it up on other machines, I’ll leave the documentation in place. |
cd
# replace 'thisismysecretpassword' with something random.
# You won't have to remember it.
echo "MPD_SECRETWORD=thisismysecretpassword" >.mpd.conf
chmod og-rw .mpd.conf
-
your mpich2 qsub scripts have to include the 2 following lines in order to allow SGE to find the PATHS to executables and libraries
module load mpich2
export MPD_CON_EXT="sge_$JOB_ID.$SGE_TASK_ID"
A full MPICH2 script is shown below. Note the #$ -pe mpich2 8 line which sets up the MPICH2 parallel environment for SGE and requests 8 slots (CPUs). (see above for more SGE script parameters)
#!/bin/bash
# good idea to be explicit about using /bin/bash (NOT /bin/sh).
# Some Linux distros symlink bash -> dash for a lighter weight
# shell, which works 99% of the time but causes unimaginable pain
# in those 1% occassions.

# Note that SGE directives are prefixed by '#$' and plain comments are prefixed by '#'.
# Text after the '<-' should be removed before executing.

#$ -q long    <- the name of the Q you want to submit to
#$ -pe mpich2 8    <- load the mpich2 parallel env and ask for 8 slots
#$ -S /bin/bash    <- run the job under bash
#$ -M harry.mangalam@uci.edu <- mail this guy ..
#$ -m bea          <- .. when the script (b)egins, (e)nds, or (a)borts
#$ -N cells500     <- name of the job in the qstat output
#$ -o cells500.out <- name of the output file.
#
module load mpich2              <- load the mpich2 environment
export MPD_CON_EXT="sge_$JOB_ID.$SGE_TASK_ID" <- this is REQUIRED for SGE to set it up.
module load neuron              <- load another env (specific for 'neuron')
export NRNHOME=/apps/neuron/7.0 <- ditto
cd /home/hmangala/newmodel      <- cd to this dir before executing
echo "calling mpiexec now"      <- some deugging text
mpiexec -np 8 nrniv -mpi -nobanner -nogui /home/hmangala/newmodel/model-2.1.hoc
# above, start the job with 'mpiexec -np 8', followed by the executable command.
12.7. MATLAB
MATLAB can be started from the login node by typing matlab. This will log you into a 64bit interactive node and start the MATLAB Desktop. matlabbig will start an interactive session on one of the claw nodes (32GB RAM).
We have 3 licenses for interactive MATLAB on the BDUC cluster. Those licenses are decremented from the campus MATLAB license pool. They are meant for running interactive, relatively short-term MATLAB jobs, typically less than a couple hours. If they go longer than that, or I see that you’ve launched several MATLAB jobs, they are liable to be killed off.
If you want to run long jobs using MATLAB code, the accepted practice is to compile your MATLAB .m code to a native executable using the MATLAB compiler mcc and then submitting that code, along with your data to a batch Q (see above for submitting batch jobs). This approach does not require a MATLAB license, so you can run as many instances of this compiled code for as long as you want without impacting the campus licenses.
The official mechanics of doing this is described here.
Some additional notes from someone who has done this is in the Appendix.
12.8. MATLAB Alternatives
There are a number of MATLAB alternatives, the most popular of which are available on BDUC. Since these are Open Source, they aren’t limited in the number of simultaneous uses, altho you should always try to run batch jobs in the SGE queue if possible. See this doc for an overview of them and further links.
12.9. Hadoop
Hadoop is a Java-based framework for running large-grained, parallel jobs on clusters. It now encompasses a large number of subprojects, but it is usually used with the MapReduce approach. It scales very well, but it is complex to run on BDUC because it requires its own filesystem and scheduler. Since on BDUC (and other general-purpose clusters which are not dedicated to hadoop full-time) the job scheduling is more general-purpose, we have to run it as a meta-job. That is, you submit a request to SGE to allocate a number of nodes on which to run hadoop; SGE allocates them to hadoop; hadoop sets up the logical structures it needs on those allocated nodes and everyone’s happy. We run hadoop under myHadoop a small bit of middleware designed to handle the interactions between SGE and Hadoop.
Note that Hadoop initializes its own filesystem on the existing /scratch directory for each node. Because Hadoop can end up storing many GBs of data, we have set up a dedicated hadoop SGE Q named (surprise) hadoop. All the nodes in this Q should have >300GB available and you can test this by running the following command on the login node:
cf --config=/usr/local/bin/cfrc --target=HADOOP 'df -h |grep sda3 | scut --c1=3'
This will start an interative script that will create a subdir in the current directory which will contain files named for all the hadoop nodes which lists the free diskspace on /scratch. You can see the results by doing this:
cd REMOTE_CMD-df--h--grep-sda3---s-<timestamp> # timestamp changes obviously
grep G *
a64-141:334G
a64-142:337G
..
..
An SGE submit script for Hadoop is here.
The usual way to exploit Hadoop is to write your application in Java, typically wrapping it into a jarfile. This Java requirement is not absolute tho. You can also write your application in Jython (Python written in Java) and therefore essentially write Java using Python. You can also write your hadoop app in pure Python (or even in C++). Here is a page describing that approach.
The hadoop installation can be found at $HADOOP_HOME. By referring to this variable, you can, for example, add standard libraries to the class path of your java application (e.g. Class-Path: $HADOOP_HOME/lib/hadoop-0.20.2-tools.jar).
(Thanks to Fabian Lindenberg for helping to set up and debug Hadoop on BDUC.)
12.10. GPUs
Thanks to Dr. Steve Jenks, the claw8 node contains 2 Nvidia C1060 Graphics Processing Units (GPUs), each with 240 cores. These cores are specialized to do SIMD tasks very fast. For example, if your code supports that kind of processing, you can get 10-100X speedup for those parts of the code. You can learn more about programming these GPUs with CUDA at the local docs or via the more up-to-date docs at NVIDIA.
In order to use the GPUs, you will have to be registered to use the GPU SGE Queue (contact harry.mangalam@uci.edu) and of course will have to provide your own code, altho the entire Nvidia SDK examples are compiled and available locally: source code at /apps/gpu/1.0/NVIDIA_GPU_Computing_SDK/C/src/, compiled biaries at /apps/gpu/1.0/NVIDIA_GPU_Computing_SDK/C/bin/. Of course, since only claw8 has the GPUs installed, you’ll only be able to run them there.
In order to run the compiled GPU code for long runs, you’ll have to submit them thru the SGE scheduler using the gpu queue which is initialized by using the module load gpu directive in your qsub script. We expect that you’ll do your debugging on your own machine altho you can do it on claw8 after you have registered and been added to the gpu group.
We currently have the CUDA Toolkit 4.0 installed and will try to remain current with NVIDIA upgrades.
13. Graphics
All the interactive nodes will have the full set of X11 graphical tools and libraries. However, since you’ll be running remotely, any application that requires OpenGL, while it will probably run, will run so slowly that you won’t want to run it for long. If you have an application that requires OpenGL, you’ll be much better off downloading the processed data to your own desktop and running the application locally.
13.1. If you connect using Linux
In order to have access to these X11 tools via Linux, your local Linux must have the X11 libraries available. Unless you have explicitly excluded them, all modern Linux distros include X11 runtime libraries. Don’t forget to use the the -Y flag when you connect using ssh to tunnel the X11 display back to your machine:
ssh -Y your_UCINetID@bduc.nacs.uci.edu
13.2. If you connect using MacOSX
The MacOSX installation DVDs come with a free, Apple-certified X11 installation. On Leopard it’s in Optional Installs → Optional Installs.mpkg All you have to do is install it and start it running in the background to accept the X11 windows (Applications → Utilities → X11) Ditto the -Y ssh flag as above.
13.3. If you connect using Windows
There are quite a few ways to use a Linux system besides logging into it directly from the console.
-
remote shell access, using PuTTY, a free ssh client, which even allows X11 forwarding so that you can use it with Xming (below) to view Graphical apps from BDUC. Putty is a straight ssh terminal connection that allows you to securely connect to the Linux server and interact with it in a purely text-based basis. For a shell/terminal cognoscenti, it’s considerably less capable than any of the terminal apps (konsole, eterm, gnome-terminal, etc) that come with Linux, but it’s fine for establishing the 1st connection to the Linux server. If you’re going to run anything that requires an X11 GUI, you’ll need to set PuTTY to do X11 forwarding. To enable this, double-click the PuTTY icon to bring up the PuTTY configuration window. On the left Pane, follow the clickpath: Connection → SSH → X11 → set the Enable X11 Forwarding. After setting this, click on Session at top of the pane, and set a name in Saved Sessions on lower right pane, click the [Save] button to save the connection information so that the next time you need to connect, the correct setting will already be set. You can customize PuTTY with a number of add-ons and config tweaks, some of which are described here.
-
Xming, a lightweight and free X11 server (client, in normal terminology). Xming provides only the X server, as opposed to Cygwin/X below. Xming provides the X server that displays the X11 GUI information that comes from the Linux machine. When started, it looks like it has done nothing, but it has started a hidden X11 window (note the Xming icon in the toolbar). When you start an X application on the Linux server (after logging in with PuTTY as described above), it will accept a connection from the Linux machine and display the X11 app as a single window that looks very much like a normal MS WinXP window. You’ll be able to move it around, minimize it, maximize it and close it by clicking on the appropriate button in the title bar. There may be a slight lag in response in that window, but over the University network, it should be be acceptable.
-
if you have trouble setting up Putty and Xming, please see this page which describes it in more detail, with screenshots
-
Cygwin/X, another free, but much larger and capable X server (combined with an entire Linux-on-Windows implementation). Provides much more power and requires much more user configuration than Xming. Cygwin/X provides not only a free Xserver but nearly the entire Linux experience to Windows. This is more than what most normal users want (both in diskspace and configuration), especially if you have a real Linux server to use. The X11 server is very good tho, as you might expect.
-
VNC server and client. Run the server on the Linux machine and connect to it with the client running on your Windows Desktop. Can provide the entire Linux Desktop experience on your Windows machine, altho with less graphics performance (it’s fine to connect to a machine on the university network, but slow across the Internet). VNC is mechanism that can present the entire Linux Desktop to the user, including not only the application windows, but the Desktop itself, with all the bells and whistles that that metaphor provides. The RealVNC package for Windows provides both the Viewer and the Server, so you can provide remote access to your Windows Desktop as well. This can be especially useful if you’re trying to demo a Desktop application to others - you can configure the VNC server to allow multiple read-only clients (they can’t take control of your desktop) to watch you run the app. Combined with the multiplaform VOIP application Skype which can run on the same machine, you have a very cheap tele-screensharing setup good for demo’ing applications. The Windows VNC server is efficient enough to support at least 10 viewing clients and the refresh rate is good enough for a mostly 2D demo across UC.
-
NoMachine Server and Clients, a system much like the VNC system but much more efficient and therefore has better performance. It is also more complicated to set up. Please read this review for an overview of what is required and how to install it. For personal use, there is a free server and client. For more connections, you’ll need a commercial license. There are also 2 free NX servers: FreeNX and Google’s recently released NeatX, both of which are fairly easy to install and allow unlimited connections. BDUC uses both the free versions and it is described in more detail immediately below.
13.4. NoMachine NX connections
We’ve added GPL’ed NXservers to the claw1 and claw6 nodes. Both have direct external connections. With the nxclient software installed on your machine, you can run the entire KDE or GNOME Desktop with remarkable speed. Here’s a screenshot of my laptop screen with the nxclient Desktop from claw1 running SAS, matlab, and tablet (a genomics assembly viewer):
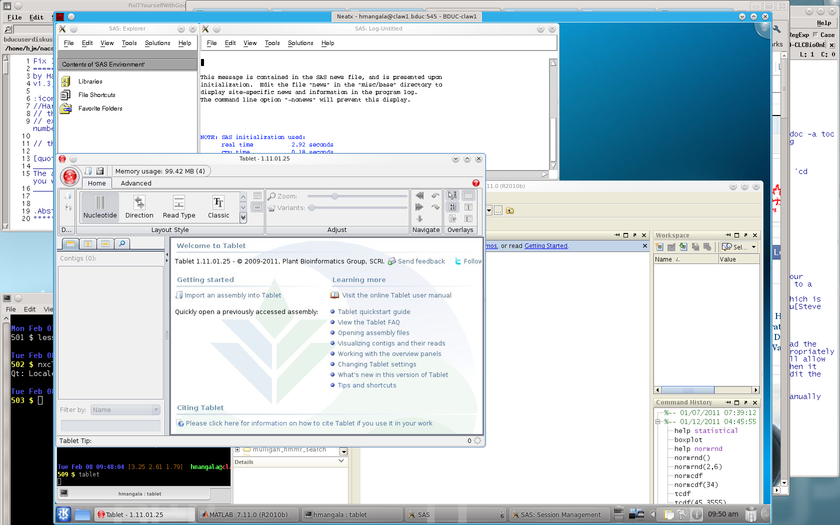
Get the appropriate client software for your platform here.
13.4.1. Configuring the nxclient
The configuration is fairly simple. The initial pane allows you to set your Login (your UCINetID and Password (your UCINetID password) and name the session anything you like.
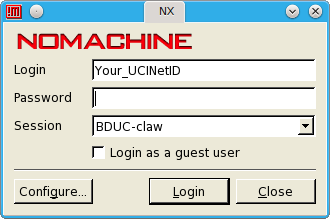
Clicking the Configure… button takes you to a set of tabbed configuration pages. The only one that needs to be modified is the 1st one General:
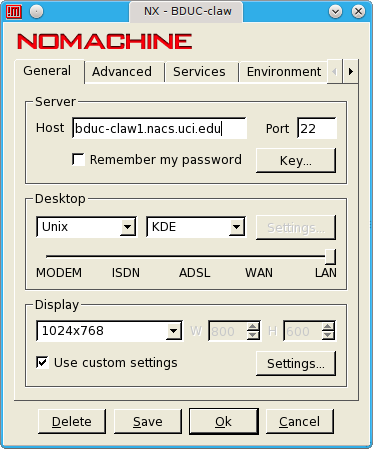
The screenshot above shows the setup for logging into the claw1 node (which supports the KDE Desktop). If you want to use it on the login node which supports the Gnome Desktop, see below:
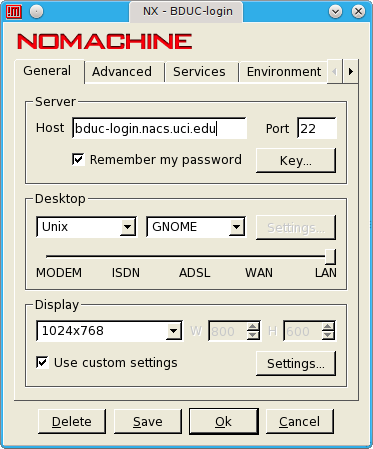
DO NOT change the default Key unless you have problems logging into the login node.
|
|
Key Changes with bduc-login
When bduc-login was upgraded, the ssh keys used to validate the nx user (who inits nxserver) changed. If you use the nxclient with bduc-login, you’ll have to change the nxclient key to this one: (also on the bduc-login node in: /usr/local/share/nxclient_dsa_key) -----BEGIN DSA PRIVATE KEY----- MIIBuwIBAAKBgQCXv9AzQXjxvXWC1qu3CdEqskX9YomTfyG865gb4D02ZwWuRU/9 C3I9/bEWLdaWgJYXIcFJsMCIkmWjjeSZyTmeoypI1iLifTHUxn3b7WNWi8AzKcVF aBsBGiljsop9NiD1mEpA0G+nHHrhvTXz7pUvYrsrXcdMyM6rxqn77nbbnwIVALCi xFdHZADw5KAVZI7r6QatEkqLAoGBAI4L1TQGFkq5xQ/nIIciW8setAAIyrcWdK/z 5/ZPeELdq70KDJxoLf81NL/8uIc4PoNyTRJjtT3R4f8Az1TsZWeh2+ReCEJxDWgG fbk2YhRqoQTtXPFsI4qvzBWct42WonWqyyb1bPBHk+JmXFscJu5yFQ+JUVNsENpY +Gkz3HqTAoGANlgcCuA4wrC+3Cic9CFkqiwO/Rn1vk8dvGuEQqFJ6f6LVfPfRTfa QU7TGVLk2CzY4dasrwxJ1f6FsT8DHTNGnxELPKRuLstGrFY/PR7KeafeFZDf+fJ3 mbX5nxrld3wi5titTnX+8s4IKv29HJguPvOK/SI7cjzA+SqNfD7qEo8CFDIm1xRf 8xAPsSKs6yZ6j1FNklfu -----END DSA PRIVATE KEY----- On your nxclient, the click-path is: [Configure] → [Key] → (delete current key) → (paste in the contents of the above text box including the BEGIN & END lines.) Then [Save] → [Save] → [OK] → [Login] |
Unlike the commercial NoMachine NXserver, these servers allow any number of connections. There may be a fairly long wait (up to a minute) before the session is initially validated and the screen comes up (the Desktop is loading on the server), but after that, the interaction is very fast.
13.4.2. Terminating the session
Note that when you close the session, you have 2 options - to Disconnect (closes the client but leaves the session running so you can reconnect to the same session you left) or Terminate (closes the client and kills the session, so you’ll start from a new Desktop instance).
Unless there is good reason to keep it running, please Terminate the session to free up resources. If you’re running a long-running process, you can Disconnect to be able to Re-connect but remember to Terminate when it’s finished.
I have run into a situation whereby if the session is ended oddly it will leave a ghost session (ie, you kill the nxclient by killing the shell from which it was started). When you next start up the nxclient, it will offer to let you re-connect to an existing session, but then be unable to reconnect. If this happens, you should still be able to start a new session, but please call me to address that situation - I have to manually remove the ghost session credentials in /usr/local/var/lib/neatx/sessions/ or /var/lib/neatx/sessions, depnding on how it was set up.
If you cannot establish a reconnection or a new connection, you may have too many ghost sessions and in that case, you should attempt to clean house by killing all your nx sessions:
# find your nx processes
# the search term 'n[x]' prevents ps from finding the grep process itself
$ ps aux |grep n[x] |grep hmangal
hmangala  9646  0.0  0.0  92260  3952 pts/18   Ss+  11:43   0:00 /bin/su hmangala -c cd && /usr/local/lib/neatx/nxserver --proto=3030000 -- hmangala
hmangala  9670  0.0  0.0  10824  1596 pts/18   S+   11:44   0:00 bash -c cd && /usr/local/lib/neatx/nxserver --proto=3030000 -- hmangala
hmangala  9711  0.4  0.0  58176 10260 pts/18   S+   11:44   0:00 /usr/bin/python /usr/local/lib/neatx/nxserver --proto=3030000 -- hmangala
hmangala 20600  0.0  0.0  10748  1500 ?        S    Aug03   0:00 /bin/bash /usr/local/lib/neatx/nxnode-wrapper hmangala DABD5CA430357900E0F012B7543A8034
hmangala 20603  0.0  0.0  70676 10696 ?        Sl   Aug03   0:00 /usr/bin/python /usr/local/lib/neatx/nxnode hmangala DABD5CA430357900E0F012B7543A8034
hmangala 20604  0.0  0.0  10748   708 ?        S    Aug03   0:00 /bin/bash /usr/local/lib/neatx/nxnode-wrapper hmangala DABD5CA430357900E0F012B7543A8034
hmangala 20608  0.0  0.2 150696 67312 ?        S    Aug03   1:45 /usr/bin/nxagent -D -name Neatx - hmangala@claw1.bduc:430 - claw1 -options /usr/local/var/lib/neatx/sessions/DABD5CA430357900E0F012B7543A8034/options -nolisten tcp :430

#        ^^^^^  the PIDs you have to kill

# and kill them off
$ kill -9  9646  9670  9711 20600 20603 20604 20608

# now try to establish an nx connection.
|
|
Further oddities with nxclient
In the myriad configurations possible, there are a few other notes that may be useful. If you can use the nxclient to log into a system and it appears to accept mouse input but no longer accepts keyboard input, you may need to define the XKEYSYMDB environment variable to explicitly point to the bduc node’s XKeysymDB file. Add the following line to your ~/.bashrc file: export XKEYSYMDB=/usr/share/X11/XKeysymDB Then kill off all your nxclient sessions and start the nxclient again. Keyboard input should work. This also addresses similar errors in older applications that use Motif widgets (nedit, others). If it still does not work, you may have the wrong keyboard selected. On bduc-login (GNOME Desktop), the way to select the correct keyboard is shown in the following images. First, click to the Keyboard selection option (below left):
and then select the closest keyboard using the scrolling list (above, right): If you start getting nx errors that result in a blank/black screen with a pop-up box that claims to be unable to complete: /bin/bash -c "/etc/X11/xinit/Xsession gnome-session", you may have damaged your ~/.Xauthority and/or ~/.ICEauthority files. The simple fix to this problem is to move them out of the way and then ssh into the node to re-create them. |
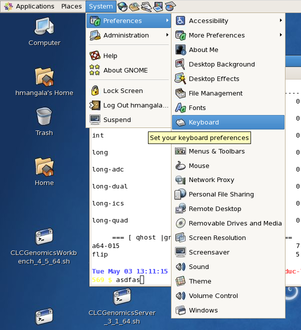
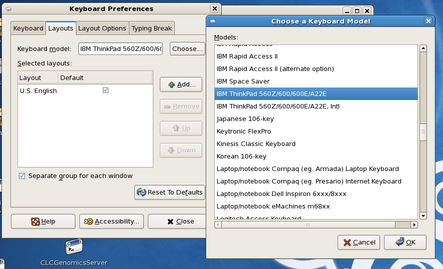
14. How to Manipulate Data on Linux
This is a topic for a whole 'nother document named Manipulating Data on Linux and the documents and sites referred to therein.
15. Frequently Asked Questions
OK, maybe not frequently, but cogently, and CAQ just doesn’t have the same ring. If you have other questions, please ask them. If they address a frequent theme, I’ll add them here. In any case, I’ll try to answer them.
-
What’s a node? Is it the same as a processor?
A node refers to a self-contained chassis that has its own power supply, motherboard (containing RAM, CPU, controllers, IO slots and devices (like ethernet ports), various wires and unidentifiable electrogrunge). It usually contains a disk, altho this is not necessary with boot-over-the-network. It’s not the same as a processor. Typical BDUC nodes (from the Jurassic period) have 2-4 CPU cores per node. Modern nodes have 8 to >100 cores.
-
When I submit a .sh script with qsub, does the following line refer to 10 processors or 10 nodes? #$ -pe openmpi 10
10 processor cores. Most modern physical CPUs (the thing that plugs into the motherboard socket) have multiple processor cores internally these days.
-
What about the call to mpiexec? mpiexec -np 10 nrniv -mpi -nobanner -nogui modelbal.hoc
Same thing. That’s why they should be the same number.
-
Is it possible for the processors on one node to be working on different jobs?
Yes, altho the scheduler can be told to try to keep the jobs on 1 node (better for sharing memory objects like libs, but worse if there’s significant contention for other resources like disk & network IO). Most of the MPI environments on BDUC are currently set to spread out the jobs rather than bunch them together on as few nodes as possible.
-
If processor 1 (working on Job A) fails, does it bring down processor 2 (working on Job B) as well?
No, and in fact it doesn’t typically work that way. A job does not run on a particular CPU; on a multi-core node, different threads of the same job can hop among CPU cores. The kernel allocates threads and processes to whatever resources it has to optimize the job.
-
Is the performance of processor 1 dependent on whether processor 2 is engaged in the same or different job?
It depends. The computational bits of a thread, when they are being executed on a CPU, don’t interfere much with the other processor. They do share memory, interrupts, and IO so if they’re doing roughly the same thing at roughly the same time, they’ll typically want to read and write at the same time and thus compete for those resources. That was the rationale for spreading out the MPI jobs rather than filling up nodes.
-
Is it possible for one processor to use more than its "share" of the memory available to the node, i.e., is it wrong for me to count on having a certain amount of memory just because I’ve specified a certain number of processors (nodes?) for my job?
The CPU running prog1 will request the RAM that it needs independent of other CPUs running prog1 or prog2, prog3, etc. If the node gets close to running out of real RAM, it will start to swap idle (haven’t-been- accessed-recently) pages of RAM to the disk, freeing up more RAM for active programs. If the computer runs out of both RAM and swap, it will hopefully kill off the offending programs until it regains enough RAM to function and then it will continue until it happens again. This is why you should try to estimate the amount of RAM your prog will use and indicate that to the scheduler with the -l mem_free directive. See the section above.
-
I can ssh to BDUC but I can’t scp files to it. Why?
Probably because you edited your .bashrc (or .zrc or .tcshrc) to emit something useful when you log in. (Both scp and ssh have a useful option -v that puts it into verbose mode that tells you much more about what the process is doing and why it fails). You need to mask this output from non-interactive logins like scp and remote ssh execution by placing such commands inside a test for an interactive shell. When using bash, you would typically do something like this:
interactive=`echo $- | grep -c i `
if [ ${interactive} = 1 ] ; then
  # tell me what my 22 latest files are
  ls -lt | head -22
fi
16. Appendix
17. Cluster Computing
17.1. What is a cluster?
A compute cluster is typically composed of a pool of computers (aka nodes) that allow users (and there are usually several to several hundred simultaneous users) to spread compute jobs over them in a way that allows the maximum number of jobs to matched to number of computers. The cluster is often composed of specialized login nodes, compute nodes, storage nodes, and specialty nodes (ie: a large memory node, a GPU node, an FPGA node, a database server node, etc)
The BDUC cluster consists of about 100 computers, each of which has 2-64 64bit CPU cores and 8-256GB RAM. All these nodes have a small amount of local storage (filesystems (fs) that are directly connected with the node that hold its Operating System, a few utilities and some scratch space (in /scratch). Some nodes have considerably larger local storage to provide more storage for a specific application or to the research group that bought it. All the nodes communicate with each other over a private 1 Gb/s ethernet network, via a few central switches. This means that each node can communucate at almost 100MB/s total bandwidth with all the other nodes but there is a bottleneck at the switches and at frequently used nodes, such as the login node and at main storage nodes.
17.2. The login node
In BDUC, the login node and a main storage are unfortunately the same one, leading to a bandwidth and CPU bottleneck at the login node. This is one main reason to consider staging data elsewhere (on the remote node /scratch storage or on the /gl filesystem) for jobs that require large amounts of data I/O. See the note on staging data above.
The CPU bottleneck is important because servicing disk read and write requests requires CPU attention in the same way that an application does. BDUC’s 100-odd compute nodes are busy consuming or producing data and quite a lot of the input and output is directed at the login node’s storage. So if someone is trying to run a compute-intensive application on the login node (especially a multicore application) it leaves very little CPU time to handle the disk requests. The Operating System is fairly robust in that it will queue such requests quite deep in order to buffer them but if the CPU cannot keep up with the requests, eventually it will run out of queue depth and the system will lock up.
SO, DO NOT RUN APPLICATIONS ON THE LOGIN NODE.
It’s fine to edit your program or data files (as long as they’re under a few MB), and even compile your programs on the login node. You can also test your programs as long as they run for very short periods - a few minutes at most. If you need to run your programs interactively, request an interactive node via SGE or ssh directly to one of them (a64-00[12], claw[1-5]).
17.3. The difference between /home and /gl
As noted above, the main storage system for BDUC was the /home filesystem, provided by the bduc-login node. The /home filesystem is a RAID6 of 15x1TB disks. RAID6 means that it can lose 2 disks before it will lose any data. However, if more than 2 disks are lost, ALL data will be lost. It has been supplemented by the /gl filesystem which is a distributed gluster fs. On the gluster fs, data is spread file-wise over 8 RAID6s on 4 different servers, each of which hosts 1/4 of the files, so even if a whole node is destroyed, 3/4 of the files will survive. This may be of little comfort if the one file you need is among the lost, but that’s why we repeat the mantra Back up your files if they are of value.
The Strongly Suggested approach is to put your code and and small intermediate analyses on /home and keep your large data and intermediate files on /gl. In this way, you’ll be able to search thru your files quickly, but when you submit large jobs to the cluster via SGE, they won’t bog down the login node, nor will they interfere with other cluster jobs since /gl is a distributed FS (and on average, only 1/4 of the cluster nodes will be interacting with the same storage node as your job). In other words, it scales well.
17.4. Write performance on /gl, especially with many small writes.
|
|
If you do not understand the following, please contact an admin to explain it; it’s important. |
Unlike the Network File System (NFS) provided by /home, the /gl filesystem (fs) has some odd quirks that can either destroy performance or be used to greatly enhance it. If you have written your own code or are using an app that writes zillions of tiny chunks of data to STDOUT, and you are storing the results on the /gl fs, you should consider passing the output thru gzip to consolidate the writes into a continuous stream. If you don’t do this, each write will be considered a separate IO event and the performance on the /gl fs will be .. well .. atrocious. We recently ran into this with the bedtools utility genomeCoverageBed. It read in a multi-GB file quickly but then choked while writing the ~2GB output file, increasing the runtime by >30X.
If, however, the STDOUT is passed thru gzip, the wallclock runtime decreases even below the usual runtime and you end up with an output file that it already compressed to about 1/5 the usual size.
The here’s how to do it using the explicit example we used and a generic one
# all the files are on the /gl fs

module load bedtools/2.15.0
 ...
cd /gl/where/your/files/are

# this is the usual (but incredibly slow) way
genomeCoverageBed -ibam RS_11261.bam  -g ref/dmel-all-chromosome-r5.1.fasta -d  > output.cov.gz

# this is the MUCH faster way, even tho you're using more CPU time
# (gzip is in another process using another CPU)
genomeCoverageBed -ibam RS_11261.bam  -g ref/dmel-all-chromosome-r5.1.fasta -d |gzip > output.cov.gz
# .............................................................................^^^^^^

# the generic example:
someapp --opt1 --opt2 --input=/gl/me/input_file | gzip > /gl/me/output_file.
17.5. Use named pipes instead of files
Note that the gzip trick mentioned above will only work with applications that write their data to STDOUT. If the app explicitly writes to a file, then you can use a named pipe (aka fifo - first in, first out) to capture and process the output.
mkfifo /gl/me/npipe  # create a named pipe
# use the named pipe as the output file and send the process into the background with '&'
some_app --input=/gl/me/gigantic_input.fq.gz --out=/gl/me/npipe --match=33 --kmer=64 ... &

# now read from the named pipe and gzip it in one go
gzip < /gl/me/npipe > /gl/me/some_app.out.gz

# and finally delete the named pipe, just as you would a file.
rm /gl/me/npipe
17.6. Some words about Big Data
To new users, especially to users who have never done BIG DATA work before: Understand what it is you’re trying to do and what that means to the system. Consider the size of your data, the pipes that you’re trying to force it thru and what analyses you’re trying to get it to perform.
It should not be be necessary to posit this, but there are clearly users who don’t understand it. There is a 1000 fold difference between each of these:
-
1,000 bytes, a KILOBYTE (KB) ~ an email
-
1,000,000 bytes, a MEGABYTE (MB) ~ a PhD thesis
-
1,000,000,000 bytes, a GIGABYTE (GB) ~ 30 X the 10 Volume The Story of Civilization.
-
1,000,000,000,000 bytes, a TERABYTE (TB) ~ 1/10 of the text content of the Library of Congress.
-
1,000,000,000,000,000 bytes, a PETABYTE (PB) ~ 100 X the text content of the Library of Congress
BDUC has about 30TB of storage on /gl to be shared among 400 users, and the instantaneous needs of those users varies tremendously. We do not use disk quotas to enforce user limits to allow substantial dynamic storage use. However, if you use hundreds of GB, the onus is on you to clean up your files and decrease that usage as soon as you’re done with it.
17.7. 1 Big File vs Zillions of Tiny Files
This subject - arcane as it might seem - is important enough to merit its own subsection. Because BDUC is community infrastructure, efficient use of its resources is important. Let me try this analogy: driving a car across country in 1st gear is possible, but it’s not efficient, wastes time and energy, and will decrease the life of the engine. Similarly, using Zillions Of Tiny files (ZOTfiles) is a similarly destructive practice. A tiny file by itself is no more inefficient than a huge one. If you have only 100bytes to store, store it in single file. However, the problems start compounding when there are many of them. Because of the way data is stored on disk, 10 MB stored in ZOTfiles of 100bytes each can easily take up NOT 10MB, but more than 400MB - 40 times more space. Worse, data stored in this manner makes many operations very slow - instead of looking up 1 directory entry, the OS has to look up 100,000. This means 100,000 times more disk head movement, with a concommittent decrease in performance and disk lifetime. If you are writing your own utilities, whether in Perl , C, Java, or Haskell, please use efficient data storage techniques, minimally as indexed file appending, preferably as real data storage such as binary formats, HDF5 and netCDF, and don’t forget about in-memory data compression (for example, using the excellent free zlib library or language-specific libraries that use compression, such as:
libio-compress-perl - bundle of IO::Compress modules
python-snappy - Python library for the snappy compression library from Google
If you are using someone else’s analytical tools and you find they are writing ZOTfiles, ask them, plead with them to fix this problem. Despite the sophistication of the routines that may be in the tools, it is a mark of a poor programmer to continue this practice.
17.8. HOWTO: Passwordless ssh
Passwordless ssh will allow you to ssh/scp to frequently used hosts without entering a passphrase each time. The process below works on Linux and Mac only. Windows clients can do it as well, but it’s a different procedure. However, regardless of your desktop machine, you can use passwordless ssh to log in to all the nodes of the BDUC cluster once you’ve logged into the login node.
In a terminal on your Mac or Linux machine, type:
# for no passphrase, use
ssh-keygen -b 1024 -N ""

# if you want to use a passphrase:
ssh-keygen -b 1024 -N "your passphrase"
# but you probably /don't/ want a passphrase - else why would you be going thru this?
save to the default places.
For the BDUC cluster case: Since all cluster nodes share a common /home, all you have to do is rename the public key file (normally id_rsa.pub in your ~/.ssh dir) to authorized_keys.
For unrelated (non-cluster) hosts: Linux users, use the ssh-copy-id command, included as part of your ssh distribution. (Mac users will have to do it manually, described just below.) ssh-copy-id does all the copying one shot, using your ~/.ssh/id_rsa.pub key (by default; use the -i option to specify another identity file, say ~/.ssh/id_dsa.pub if you’re using DSA keys)
ssh-copy-id  your_bduc_login@bduc.nacs.uci.edu
# you'll have to enter your password one last time to get it there.
What this does is to scp id_rsa.pub to the remote host (the ssh server your’re trying to log into) and append that key to the remote file ~/.ssh/authorized_keys. If things don’t work, check that the id_rsa.pub file has been appended correctly.
Then verify that it’s worked by ssh’ing to BDUC. You shouldn’t have to enter a password anymore.
For Mac users, scp the same keys to the remote host and append your public key to the remote ~/.ssh/authorized_keys. Here are the commands below. Just modify the UCINETID value and mouse them into the Terminal window on your local Mac.
bash  # starts the bash shell just to make sure the rest of the commands work
cd    # makes sure you're in your local home dir
export UCINETID=""  # fill in the empty quotes with *your UCINETID*

# you'll need to enter the password manually for the next 2 commands)

scp ~/.ssh/id_rsa.pub ${UCINETID}@bduc-login.nacs.uci.edu:~/.ssh/id_rsa.pub
ssh ${UCINETID}@bduc-login.nacs.uci.edu 'cat ~/.ssh/id_rsa.pub >> ~/.ssh/authorized_keys'

# and now you should be able to ssh in without a password
ssh ${UCINETID}@bduc-login.nacs.uci.edu
17.9. Notes on using the MATLAB comiler on the BDUC cluster
(Thanks to Michael Vershinin and Fan Wang for their help and patience in debugging this procedure).
As noted, the official docs for compiling your MATLAB code is is described here. Before you start hurling your .m code at the compiler, please read the following for some hints.
The following is a simple case where all the MATLAB code is in a single file, say test.m. Note that for the easiest path, you should write your MATLAB code to compile as a function. This means that keyword function has to be used to define the MATLAB code (see example below). If you want to pass parameters to the function, you have include a function parameter indicating this.
# Before you use any MATLAB utilities, you will have to load the
# MATLAB environment via the 'module' command

module load matlab/R2009b

# for a C file dependency, you compile it with 'mex'.  Note that mex doesn't like
# C++ style comments (//), so you'll have to change them to the C style /* comment */

mex some_C_code.c    # -> produces 'some_C_code.mexa64'

# then compile the MATLAB code for a standalone application.
# (type mcc -? for all mcc options)

# If the m-code has a C file dependency which has already been mex-compiled,
# mcc will detect the requirement and link the '.mexa64' file automatically.

mcc -m test.m  # -> 'test'  (can take a minute or more)

# !! if you have additional files that are dependencies, you may have to define
# !! them via the '-I /path/to/dir' flags to describe the dirs where your
# !! additional m code resides.

# for a _C_ shared lib (named libmymatlib.so) with multiple input .m files

mcc -B csharedlib:libmymatlib file1.m file2.m file3.m


# for a _C++_ shared lib (named libmymatlib.so) with multiple input .m files

mcc -B cpplib:libmymatlib file1.m file2.m file3.m
17.9.1. Passing variables to compiled MATLAB applications
Also, few programs will be useful with all the variables compiled statically. There are a few ways to pass variables to the program - the easiest for a single or a few variables is to use the the MATLAB input function to read in a character, string, or vector and process it internally to provide the required variables.
Another way, especially if you have a large number of variables to pass, include the variables in a file and feed that file to the matlab app. This will require that the matlab app is designed to read a file and parse it correctly.
Both are described in some detail in the official MATLAB documentation Passing Arguments to and from a Standalone Application.
More examples are described here, in the example function matlab_sim() and in the text following.
17.9.2. Files produced by the mcc compiler
In the standalone case which will probably be the most popular approach on BDUC, the mcc compilation will generate a number of files:
readme.txt  ...............  autogen'd description of the process
test   ....................  the 'semi-executable'
test.m  ...................  original 'm code'
test_main.c  ..............  C code wrapper for the converted m code
test_mcc_component_data.c .  m code translated into C code
run_test.sh  ..............  the script that wraps and runs the executable
test.prj  .................  XML description of the entire compilation
                               dependencies (Project file)
In order to now run the executable, you often can’t submit the auto-generated run_test.sh directly in the SGE Q. You have to submit it wrapped in a SGE script which finally calls the run_test.sh script which sets up all the necessary environment variables and paths to run the executable.
So while you can test it for a few minutes like this:
./run_test.sh [matlab_root] ./test

# where the [matlab_root] would be '/apps/matlab/r2009b' for the
# matlab version that supports the compiler
Note that if you have already loaded the MATLAB module, you can usually run the compiled executable alone from the commandline.
However, for long/production runs, you will have to create a bash script (call it runmycode.sh) like this:
#!/bin/bash

#$ -S /bin/bash          # run with this shell

#$ -N comp_matlab_run    # this name shows in qstat
#$ -q long               # run in this Q
#$ -l h_rt=50:00:00      # need 50 hour runtime
#$ -l mem_free=2G        # need 2GB free RAM
#$ -l scr_free=1G        # need 1 GB scratch space
#$ -cwd            # run the job out of the current directory
                   # (the one from which you ran the script)


#$ -notify
#$ -M <email> - send mail about this job to the given email address.
#$ -m beas          # send a mail to owner when the job
#                       begins (b), ends (e), aborted (a),
#                       and suspended(s).

./run_test.sh  /apps/matlab/r2009b ./test
and qsub it to SGE:
qsub runmycode.sh
17.9.3. MATLAB Compilation Example
Below is a very simple example showing how to compile and execute some MATLAB code. Save the following code to a file named average.m.
function y = average(x)
% AVERAGE Mean of vector elements.
% AVERAGE(X) is the mean of vector, where X is a vector of
% elements. Nonvector input results in an error.
[m,n] = size(x);
if (~((m == 1) | (n == 1)) | (m == 1 & n == 1))
    error('Input must be a vector')
end
y = sum(x)/length(x);      % Actual computation
y
Once the code is saved as average.m, compile by copying and pasting into a terminal window.
module load matlab/R2009b   # load the MATLAB environment
mcc -m average.m;           # compile the code (takes many seconds)
z=1:99                      # assign the input vector to a shell variable
./average $z                # call the executable with the range.
Note also that if you’re going to run this under SGE as multiple instances, each instance will have to run with the appropriate MATLAB environment so you will have to preface each exec with the module load matlab/R2009b directive.
17.10. Resolving Missing Libraries
Many of the problems we hear about are due to missing or incompatible library dependencies. A complicated program (like R) has many such dependencies:
$ ldd libR.so
        linux-vdso.so.1 =>  (0x00007fff003fc000)
        libblas.so.3 => /usr/lib64/libblas.so.3 (0x00002b83c1c32000)
        libgfortran.so.3 => /usr/lib64/libgfortran.so.3 (0x00002b83c1e88000)
        libm.so.6 => /lib64/libm.so.6 (0x00002b83c217c000)
        libreadline.so.5 => /apps/readline/5.2/lib/libreadline.so.5 (0x00002b83c23ff000)
        libncurses.so.5 => /usr/lib64/libncurses.so.5 (0x00002b83c263c000)
        libz.so.1 => /usr/NX/lib/libz.so.1 (0x00002b83c2899000)
        librt.so.1 => /lib64/librt.so.1 (0x00002b83c29ad000)
        libdl.so.2 => /lib64/libdl.so.2 (0x00002b83c2bb7000)
        libfunky.so.2 => not found
        libgomp.so.1 => /usr/lib64/libgomp.so.1 (0x00002b83c2dbb000)
        libpthread.so.0 => /lib64/libpthread.so.0 (0x00002b83c2fc8000)
        libc.so.6 => /lib64/libc.so.6 (0x00002b83c31e4000)
        /lib64/ld-linux-x86-64.so.2 (0x0000003fe7600000)
        libgfortran.so.1 => /usr/lib64/libgfortran.so.1 (0x00002b83c353c000)

(there is no libfunky.so.2 dependency yet in R)
and each of them typically has more, so it’s fairly common for an update to break such dependency chains, if only due to a few missing or changed functions.
If you run into a problem that seems to related to this, such as:
unable to load shared object '/apps/R/2.14.0/lib64/R/modules/libfunky.so.2':/
   libfrenemy.so.3: cannot open shared object file: No such file or
directory
The above extract implies that the library libfunky.so.2 can’t find libfrenemy.so.3 to resolve missing functions, so that lib may be missing on the node that emitted the error.
If this error is emitted from a node during a batch job, it may be hard to debug which nodes are in error. To resolve this by yourself, it’s sometimes useful to use clusterfork to debug the problem.
In the above case, you would issue a command such as:
 cf --target=PERC 'module load R/2.14.0;  \
   ldd /apps/R/2.14.0/lib64/R/modules/libfunky.so.2 |grep found'
where the libfunky.so.2 is the library in question. The results will capture the STDERR and STDOUT from the single-quoted command in node-named files in a subdir that begins with REMOTE_CMD- in the working directory. Examining those files usually identify the offending nodes.
Please be careful in using cf since you can easily overwhelm the cluster if the command demands a lot of CPU or disk activity. Try the command on one node first to determine the effect and only issue the cf command after you’ve perfected it.
18. Release information & Latest version
The latest version of this document should always be available here. The asciidoc source is available here.
This document is released under the GNU Free Documentation License.